Appium Testing
- What is the difference between Appium Vs Calabash?
Ans:
Features | Appium | Calabash |
Language Support | Python, javascript, ruby, java & all major languages | Only language Ruby is supported |
iOS mobile web page | We need a custom safari app for automation | Not well supported |
Hybrid iOS app | Custom UI commands & iOS UI Automator | Custom UI commands & iOS framework |
Native iOS app | Only the iOS UI Automator | iOS instrumentation – calabash iOS |
Android Mobile web app | Only automates chrome browser | Not well supported |
Hybrid Android app | Only the selendroid app | Android instrumentation – calabash android |
Native Android app | Both android UI Autometer & selendroid | Android instrumentation – calabash android |
Internal tools | Android, iOS UI Autometer & selendroid | Android & iOS instrumentation framework |
- What are native Apps?
Ans: An open-source tool that is required for mobile web, automating Native and hybrid application on Android and IOS platform is known as Appium which was in 2012. Appium is considered to be a cross-platform that will low you to write tests that are on multiple platforms like Android and IOS. They do this using the same API. This facility will enable you to do reuse codes between Android and IOS test sites.
Those Apps are written by using Android SDKs and IOS are known as Native Apps.
Want to become a certified Appium? then Enrol here to get Appium Online Training & Certification Course from Mindmajix
- What are Mobile Web Apps?
Ans: There are mobile web pages that are those web apps that are accessed with mobile browsers. In the case of the IOS platform, Appium supports Safari and for the Android platform, Chrome or any other built-in browser is used.
- What are hybrid apps?
Ans: Those apps that are equipped with a wrapper around the web view are known as Hybrid app. This is native control that will facilitate the interaction with the web content.
- Name the language that is used to write tests in Appium?
Ans:
- The tests of Appium are written in any language and this is because appium is nothing but an HTTP server. It is also important that the test should be interfaced with Appium and it uses HTTP libraries so that they can create HTTP sessions.
- In order to create the right commands in Appium then all, you need to know the Selenium protocol.
- The most sought-after development frameworks are .Net, C#, Java, Python, JavaScript, and Ruby.
[data:image/svg+xml;base64,PHN2ZyB3aWR0aD0iMTA5MyIgaGVpZ2h0PSIxNjAiIHhtbG5zPSJodHRwOi8vd3d3LnczLm9yZy8yMDAwL3N2ZyIgdmVyc2lvbj0iMS4xIi8+](data:image/svg+xml;base64,PHN2ZyB3aWR0aD0iMTA5MyIgaGVpZ2h0PSIxNjAiIHhtbG5zPSJodHRwOi8vd3d3LnczLm9yZy8yMDAwL3N2ZyIgdmVyc2lvbj0iMS4xIi8+)
- What are the prerequisites to use Appium?
Ans: The pre-requisites that are used in Appium. They are listed below.
- Eclipse IDE
- Android SDK
- TestNG
- Web driver language binding library
- JS
- JDK
- APK App Info on Google play
- Selenium server jar
- Appium for Windows
- Write the advantages of using Appium?
Ans: The advantages of Appium are listed below:
- Using the same API, Appium will allow you to write tests that are against mobile platforms.
- By using any kind of test framework or language you can write and run the tests.
- Appium is an open-source platform so you can contribute to it easily.
- For the hybrid mobile applications and Native, Appium provides cross-platform.
- Appium supports the JSON wire protocol.
- Appium does not require recompilation of App.
- Appium also supports automation tests on the physical devices and also for simulator or emulator both.
- Appium does not have any dependency on mobile devices.
- Name the test frameworks that are supported by Appium?
Ans: Test frameworks are not supported by appium since there is no need to do it. All test frameworks can be used by Appium. Some examples are the .net unit test and NUnit. A test for Appium is written using one of the drivers so that the tests can interface with the appium in case of external dependency.
- What are the disadvantages of Appium?
Ans: The disadvantages of Appium are listed below:
- The testing of that android that is lower than 4.2 is not allowed.
- Appium has limited support for hybrid app testing. You will not be able to test the action that allows switching of applications from native to web app and from web app to native.
- There is no support that will allow you to run an Appium Inspector on Microsoft Windows.
- What are the requirements to write Appium tests?
There are certain basic requirements when it comes to writing Appium tests and they are:-
- Driver client: Mobile applications are driven by Appium like that of a user. With the help of a client library, Appium tests can be written and these will wrap the steps of a test and then send it to Appium over the HTTP.
- Appium Session: Appium tests take place within a session so it is important to initialize an appium session first. Once there is an end to the automation of a session it will be ended and wait again for the next session.
- The desired capabilities: In order to initialize an appium session it is very important to design some parameters which are known as desired parameters. These parameters are platform version, platform name, device name, and many more. This also helps in specifying the type of automation that is required from the Appium server.
- Driver Command: In Appium you have the facility to write the tests by using a big and expressive collection of commands.
- Name the Appium inspector?
Ans: Just like a selenium IDE playback and record tool, Appium consists of an inspector that is used to record and playback. With the help of this, you can record and play native application behavior which is achieved by inspecting DOM. It helps in generating the test scripts in any language that is preferred. But Appium Inspector is not good support Windows and they use UIAutomator viewer in the option.
- Suppose you are testing App, how will the data be exchanged between your test and the App?
Ans: In Appium the Web driver specification is not made for the purpose of exchanging data with the app. But it is not totally impossible to exchange data. It is achievable and it will require you to build more layers of testability.
- Explain the design of the Appium?
Ans: Appium is considered as an HTTP server that is written using the Node.js platform. It runs on both android and IOS sessions with the help of web driver JSON wire protocol. After the download and installation of the Appium are completed the server is then set up on the machine which exposes a REST API.
Then the Appium also receives connections and command requests from clients. These commands are then executed on mobile devices. Generally, appium respond backs with an HTTP response. To execute the request, Appium uses mobile test automation frameworks so that it can drive the user interface of the apps. Some of the mobile automation frameworks are
- Google UIAutomator for Android API of level 16 or more than that
- Apple instruments for the IOS platform
- For android API level 15 or lesser than that, Selendroid is used.
- How can you find the DOM element or X path in the case of a mobile application?
Ans: In order to find the path between DOM elements or X path elements, you can make use of “UIAutomateviewer” in the case of the Android application.
- What are the pros and cons of Appium?
Ans:
Pros-
Irrespective of the platform, the programmer will be able to automate all the complexities which remain under a single Appium server. Also, Appium helps in providing cross-platform mobile testing which signifies that the same test pattern will work on multiple platforms.
With the help of Appium, there will be no need for extra components in the app to make it more users friendly. Appium can also automate hybrid, web, and native mobile applications.
Cons –
It is not possible to run scripts on multiple IOS simulators simultaneously. With the help of Appium, you are able to use UI Automator in the case of Android automation which only supports the Android SDK platform and those API which is 16 more than that. For using an older version of APIs you will have to use another open-source library which is known as Selendroid.
Appium Interview Questions and Answers for Experienced
- Name the types of errors that you can face in Appium?
Ans:
- Error type one: These types of errors occur when there is the need for desired capabilities but they are not provided. Missing of Device name or platform name is considered to be part of this error type.
- Error type two: These types of errors occur when you cannot find ADB. To avoid this type of error can be avoided by setting the Android Home environment variable with the Android SDK root directory path.
- Error type three: This falls under the category of penqa. selenium.Session Not Created Exception which will not allow you to create a new session.
- Is there a need for a server machine to run tests on Appium?
Ans: In order to run tests on Appium, there is no need for a server machine. The 2-tier architecture is facilitated with Appium. It is in this 2-tier architecture that the test machine gets connected to a test server that is running on Appium and also automating the whole thing. Appium can be run on the same machine where you are running the tests.
- Do you think it is possible to interact with the apps by using javascript while you are testing the Appium?
Ans: While you are testing the Appium it is possible for you to interact with the apps using Javascript. During the time when the commands are being run on Appium, the server will then send the script to the app that is wrapped in an anonymous function that is to be executed.
- What are the most difficult scenarios that one might face while testing Appium?
Ans: Data exchange is the most difficult scenario that one might face while testing Appium.
- Is it possible to run tests in a multithreaded environment while you are using Appium?
Ans: It is indeed possible to run tests on the multithreaded environment but you have to make sure that no two tests are running simultaneously on the same Appium server.
- In the case of the Android platform is it necessary to have an app’s .apk so that it can automate using Appium or do we also need an app in the workspace?
Ans: In the case of the android platform, to automate using Appium you will require only a .apk file.
- What is an Appium package master? How can you create an Appium Package?
Ans: A set of tools that are required to create and manage appium packages are defined as Appium Package master. In order to create a package using the following code:-
#using es7/babe1
Gulp create-package –n
#regular es5
Gulp create-package —nobabe1 –n
The package will be created in the out/
- What is the underlying API that Appium follows?
Ans: The underlying selenium API is followed by Appium so that it can automate test cases. It is said that since all the selenium APIs are present in Appium as well so Appium is an extension to the selenium.
- How can you inspect elements that are present in the Native Android App?
Ans: With the help of the UI Automator tool that is present in Android SDK, you will be able to access those object locators that are part of the Android Native app.
- Mention the method with which you can scroll down in App?
Ans: With the help of the scrollTo () method, you will be able to scroll down in App. Also, such a method will help you to automatically scroll until the specific text is not match.
- Is it possible to start an Appium server programmatically?
Ans: It is possible to start an appium server programmatically. Generally, the commands that are being entered to the command prompt are written in note pad and it is saved with .bat extension and you can click the bat file.
- How can you inspect elements on the IOS apps?
Ans: With the help of using an Appium inspector that is a GUI-based tool, you can identify elements on IOS apps. These GUI-based tools are quite similar to that of selenium IDE.
- How is it possible to identify Mobile browser objects?
Ans: ou can make use of User-Agent in order to identify objects in the Mobile browser. It is done by using the user agent and then changing the browser as the mobile proxy and thus gets an object.
- Write the command that will allow you to identify objects uniquely when there are multiple objects within the same class name using Appium?
Ans: With the help of the command driver. find element (By.className) it is possible to identify the elements uniquely.
- Give the difference between emulator and simulator?
Ans: The simulator is used for calling IOS virtual devices that will launch from Xcode in MAC. The emulator is used for calling Android virtual devices.
- Do I need Appium?
Ans: The answer to such a question is always: “It depends on what you need!”. So the actual question becomes: “Which conditions make Appium suitable for me?”. The most important assumption is that you are developing apps (pretty obvious I know).
If you are developing an app for a specific platform (and have no intention of supporting others in the future), Appium is not really required and this is basically the answer you are looking for. Appium becomes meaningful only when you have apps targeting more than one platform (Windows, Android, or iOS to cite some). Appium becomes essential if you have a web view-based app (necessarily) targeting many platforms out there.
- How difficult is it to set up a working environment?
Ans: The assumption is that Appium comes with not-so-tiny documentation, so users are not really left alone. However, it is not so straightforward to set up Appium to work on a Windows or Mac machine (did not try on Unix so far).
In my experience, instead of installing the GUI-based application, it is much better to install the command-line application (which is released more often). Also beware [sudo], as Appium will surely bite you back late in time if you installed it as a [superuser] (this is probably the clearest point in the documentation)
- Can Appium be used for all my tests?
Ans: This is an implied question in this question. The answer is No (in general). As I said before Appium is not suitable for all types of tests you might want to write (this depends on the functionalities you need to cover). There are some scenarios that can be difficult to test and some of them are so platformed specific that you will need to write some suites just for Android or iOS for example.
Remember that you can always get to do something no matter how hard it is, so you can test all your difficult scenarios using Appium, but always keep in mind one question: is it worth the time and the pain? Having Appium testing some scenarios leaving a few tests to other approaches is fine too! The world is not black and white!
- What is Appium’s most considerable limitation?
Ans: Hand down my chin starting to think and mumbling. If I had to provide one single thing you should be aware of about Appium before starting using it, it would surely be multiple session handling. Since Appium is a server, it serves HTTP requests; you might have two different computers running a test each against the same Appium server:
what happens? As for now, Appium does not support this scenario and the second test will be aborted. This is a considerable limitation because no queuing system comes with Appium. If you need to support multiple sessions, you will need to implement this feature by yourself.
- How active is Appium?
Ans: Appium is available on GITHUB and there you can find all you need. The Appium team is responsible for developing many different subsystems revolving around Appium (like APIs for different languages), thus I can tell you that this product is alive and very active.
The team is also pretty well responsive and once you open an issue you will find a reply after no more than 36 hours (this ETA comes from my personal experience). The community around Appium is also pretty large and growing every month.
- Which approach is the best? Testing on real devices or simulators/emulators?
Ans: This is a tough question because both options offer different levels of testability and flexibility when testing. There are also many problems associated with each. So my answer will be again: “It depends on your needs!”.
Running the test on a device is, always in my opinion, the best solution because it offers a testing environment completely aligned with the running environment: tests run on those devices where your apps will be used once published in stores. However devices must be connected to the Appium server via USB at least, and this is not always a very nice thing.
ADB has a known issue for which a device disconnects after a while (even though it remained plugged all the time): because of this your tests might fail after a while and Appium will report that a device could not be found! I had to write a component that resets ADB after some time so that devices will not disconnect.
- Tests on emulators or simulators?
Ans: On the other hand, emulators/simulators will never disconnect from Appium. They also offer nice options like the ability to choose the orientation or other hardware-related configurations.
However, your tests will run much slower (sadly, my tests ran 3 times slower), and do expect some crazy behavior from the Android emulator which sometimes shuts down unexpectedly. Another problem is that emulators tend to allocate a lot of memory.
- I already have platform-specific tests for my app, what should I do to migrate to Appium?
Ans: Unfortunately, there is not a magic formula to translate your tests into Selenium tests. If you developed a test framework on different layers and observed good programming principles, you should be able to act on some components in your tests in order to migrate your suites to Appium.
Your current tests are going to be easy to migrate if they are already using an automation framework or something close to a command-based interaction. Truth be told, you will probably need to write your tests from the beginning, what you can do is actually reusing your existing components.
- How much time does it take to write a test in Appium?
Ans: Of course, it depends on the test. If your test simply runs a scenario, it will take as many commands as the number of interactions needed to be performed (thus very few lines). If you are trying to exchange data, then your test will take more time for sure and the test will also become difficult to read.
- Any tips or tricks to speed up my test writing activity or my migration process?
Ans: Here is one piece of advice. Since your tests will mostly consist of automation tasks (if this condition is not met, you might want to reconsider using Appium), make interactions reusable! Do not write the same sub-scenarios twice in your tests, make a diagram of what your scenarios are and split them into sub-activities; you will get a graph where some nodes are reachable from more than one node.
So make those tasks parametric and call them in your tests! This will make your test writing experience better even when you need to migrate from existing tests (hopefully you already did this activity for your existing suites).
- What test frameworks are supported by Appium?
Ans: Appium does not support test frameworks because there is no need to support them! You can use Appium with all the test frameworks you want. NUNIT and.NET UNIT TEST FRAMEWORK are just a few examples; you will write your tests using one of the drivers for Appium; thus your tests will interface with Appium just in terms of an external dependency. Use whatever test framework you want!
- Is it possible to interact using Javascript with my apps, while the appium testing running?
Ans: Yeah, It is possible**!** Selenium has commands to execute Javascript instructions on your app from your tests. Basically, you can send a JS script from your test to your app; while the running commands on Appium, the server sends the scripting to the apps you used by wrapping it into an anonymous function that has to be executed.
- Is it Returning the values?
Ans: However, your Javascript interaction can get more advanced as your script can return a value that will be delivered to your test when the HTTP response is sent back by Appium once your Javascript has finished running.
However this scenario comes with a limitation: your Javascript can send back only primitive types (integers, strings), not complex objects. The limitation can be overtaken by passing objects as JSON strings or by modifying Appium’s or Selenium’s code to support specific objects.
- How can I exchange data between my test and the app I am testing?
Ans: Appium, actually the WebDriver specification, is not made for exchanging data with your app, it is made to automate it. For this reason, you will probably be surprised in finding data exchange is not so easy. Actually, it is not impossible to exchange data with your app, however, it will require you to build more layers of testability.
- What data exchange is?
Ans: When I say “data exchange” I am not referring to scenarios like getting or setting the value of a textbox. I am also not referring to getting or setting the value of an element’s attribute. All these things are easy to achieve in Appium as Selenium provides commands just for those. By “data exchange” I mean exchanging information hosted by complex objects stored in different parts of your review-based app like the window object.
Consider when you dispatch and capture events, your app can possibly do many things and the ways data flows can be handled are many. Some objects might also have a state and the state machine behind some scenarios in your app can be large and articulated. For all these reasons you might experience problems when testing.
- What are Testability layers?
Ans: In order to make things better, as a developer, what you can do is adding testability layers to your app. The logic behind this approach is simply having some test-related objects in your app which are activated only when your tests run. I learned about this strategy from one of my colleagues Lukasz and such a technique can be really powerful. Enable your testability layers when testing in order to make data exchange easy.
- Is it Exchanging data through Javascript?
Ans: Selenium provides commands to execute Javascript on the app, it is also possible to execute functions and have them return data (only basic types). If you exchange JSON strings it should be fine as JSON.stringify(str) will turn your JSON string into an object on the app side, while on the test side (depending on the language you are using), you can rely on hundreds of libraries to parse the string you receive.
- What are the most difficult scenarios to test with Appium?
Ans: Appium is not suitable for all types of tests. There is a particular scenario that will make your tests more difficult to write: data exchange. I already said it but I will repeat the same thing because it is very important: Appium and WebDriver are designed to automate stuff… not to exchange data with them. So what if we need to exchange information with our app during tests?
Should we give up on Appium and write our tests manually for each platform? I am not saying this, but there are cases where you should consider this option (not nice I know, but if the effort of writing tests for Appium is higher than the benefits, then just throw Appium away).
Appium is very nice because it will let you write tests once for all platforms instead of writing as many tests as the number of platforms you need to support. So if you need to exchange data with your app while testing it and this data flow is the same for all platforms, then you should probably keep on using Appium and find a way to write a layer on top of it to handle data. Depending on your needs this might take time, but, in my experience, it is really worth it.
- I don’t want to set up a whole infrastructure for my tests and I don’t want to spend money on HW. Can Appium help me?
Ans: If you think about it, what really is required from you is writing tests. Then the fact that you must deploy an Appium server somewhere is something more. If you want to skip this part, you can rely on some web services that already deployed a whole architecture of Appium servers for your tests. Most of them are online labs and they support Selenium and Appium.
- I need to debug Appium, is it difficult?
Ans: Not really! Appium is a NODE.JS application, so it is Javascript in the essence. The code is available on GITHUB and can be downloaded in a few seconds as it is small and not so complex. Depending on what you have to debug, you will probably need to go deeper in your debugging experience, however, there are some key points were setting a breakpoint is always worth:
the proxy component is worth a mention. In appium/lib/server/proxy.js you can set a breakpoint in function doProxy(req, res), which will be hit every time commands are sent to platform-specific components to be translated into automation commands.
- I build my apps with CORDOVA, is it supported by Appium?
Ans:
- CORDOVA is a very famous system that enables you to develop web view-based apps for all platforms in a short time. Appium does not explicitly say that Cordova is supported, even though they do it implicitly as some examples using apps built with Cordova are provided on Appium’s website. So the answer is that Cordova should not be a problem. Why am I being so shy about it? Because anything can happen and it actually happened to me!
- Cordova and Appium are two different projects that are growing up separately and independently, of course, a mutual acknowledgment is present, but both teams do not really talk to each other when pushing features. So problems can occur (I am currently dealing with a problem concerning Cordova’s new version which is causing my tests to fail).
- What are the basic commands that I can use in the SELENIUM protocol?
Ans:
Google’s SELENIUM provides a collection of commands to automate your app. With those commands you can basically do the following:
- Locate web elements in your web view-based app’s pages by using their ids or class names.
- Raise events on located elements like Click().
- Type inside text boxes.
- Get or set located element’s attributes.
- Execute some Javascript code.
- Change the context in order to test the native part of your app or the web view. If your app uses more web views, you can switch the context to the web view you desire. If your web view has frames or iframes inside, you
- can change the context to one of them
- Detect alert boxes and dismiss or accept them. Be careful about this functionality, I experienced some problems.
- I want to run my tests in a multithreaded environment, any problems with that?
Ans: Yes! You need some special care when using Appium in a multithreaded environment. The problem does not really rely on the fact of using threads in your tests:
you can use them but you must ensure that no more than one test runs at the same time against the same Appium server. As I mentioned, Appium does not support multiple sessions, and unless you implemented an additional layer on top of it to handle this case, some tests might fail.
- How can I run Android tests without Appium?
Ans:
- For older versions of Android Appium might not be supported. For instance, Appium is only supported in Android versions 4.4 or later for MOBILE WEB APPLICATION tests, and Android versions 2.3, 4.0, and later for MOBILE NATIVE APPLICATION and MOBILE HYBRID APPLICATION tests.
- For those versions in which Appium is not supported, you can request an emulator driven by Webdriver + Selendroid. All you need to do is use our PLATFORMS CONFIGURATOR and select Selenium for the API instead of Appium.
- In the Sauce Labs test, you will notice that the top of the emulator says “AndroidDriver Webview App”. In addition, you will notice that you will get a “Selenium Log” tab which has the output of the Selendroid driver.
- With an emulator driven by Webdriver + Selendroid, you will be able to TEST MOBILE WEB APPLICATION only. You should be able to select any Android emulator version from 4.0 to the latest version and any Android emulator skin (e.g “deviceName”:” Samsung Galaxy Tab 3 Emulator”).
- How can I run iOS tests without Appium?
Ans:
- For older versions of iOS Appium might not be supported. For instance, Appium is supported in iOS versions 6.1 and later. For earlier versions of iOS, the tool or driver used to drive your mobile applications automated test is called iWebdriver.
- To obtain a simulator driven by iWebdriver use our PLATFORMS CONFIGURATOR and select Selenium for the API instead of Appium. With an emulator driven by iWebdriver you will be able to test MOBILE WEB APPLICATION only. In addition, in the Sauce Labs test, you will notice a “Selenium Log” tab which has the output of iWebdriver.
- What mobile web browsers can I automate in the Android emulator?
Ans: Currently, the only browser that can be automated in our Android emulators is the stock browser (i.e Browser). The Android stock browser is an Android flavor of ‘chromium’ which presumably implies that its behavior is closer to that of Google Chrome.
Why is Appium used for mobile application testing?
Appium is used for mobile application testing because of its advantages over other mobile automation testing tools.
Open-source, thus freely available and easy to use.Supports multiple programming languages and provides a flexible way of writing automation scripts.Supports multiple platforms, including Android and iOS.Supports native and hybrid applications; therefore, it can be used to test a wide range of mobile applications.Offers many advanced features, such as touch actions, mobile gestures, etc.
What is the difference between native, hybrid, and web applications in Appium?
Here are the differences between native, hybrid, and web applications in Appium:
Native Applications | Hybrid Applications | Web Applications |
Specific to a particular platform (iOS or Android). | It can be developed for multiple platforms using a single codebase. | Accessible from any device with an internet connection. |
Uses native UI elements provided by the platform. | Can use both native and web UI elements. | Uses web UI elements. |
Faster and more responsive than hybrid and web apps. | Slower than native apps but faster than web apps. | Slower than native and hybrid apps. |
Developed using platform-specific languages (Swift, Objective-C, Java, Kotlin). | Developed using web technologies (HTML, CSS, JavaScript) and wrapped in a native container. | Developed using web technologies (HTML, CSS, JavaScript). |
Can access all device features and hardware (camera, GPS, etc.). | Can access most device features and hardware. | Limited access to device features and hardware. |
Can work offline | Can work offline to a limited extent | Cannot work offline. |
What programming languages are supported by Appium?
Appium supports a wide variety of programming languages for creating test scripts. Java, Python, Ruby, JavaScript, PHP, and C# are among the programming languages supported. Additionally, Appium supports Kotlin, Swift, and Perl in addition to any language that can invoke the WebDriver protocol. The expertise of the test automation team, the development environment, and the project requirements all play a role in the programming language chosen for writing test scripts.
What are the steps involved in setting up Appium?
Setting up Appium involves several steps, which are as follows:
Install Appium: First, download and install Appium on your local machine or server. Appium can be installed using package managers like npm or Homebrew or directly from the Appium
website.Install SDKs and JDKs: Appium requires the software development kit (SDK) of the mobile platform you want to test on. For example, if you want to test an Android app, you must install the Android SDK. You must also install the Java Development Kit (JDK) for running Appium.
Set up environment variables: After installing the SDKs and JDK, set up the environment variables so that Appium can locate them. For example, set the PATH variable to the location of the SDKs and JDK.
Install and configure IDE: Choose an Integrated Development Environment (IDE) for writing test scripts, such as Eclipse or IntelliJ IDEA. Configure the IDE with the necessary plugins and dependencies for Appium.
Connect a device or emulator: Connect a physical device or launch an emulator to test on. For Android, use Android Debug Bridge (ADB) to connect the device or emulator to Appium. For iOS, use the Xcode developer tools.
Start Appium server: Start the Appium server by running the Appium executable or using a package manager. The Appium server listens for incoming commands from the test script and translates them into actions on the device or emulator.
Write and Run test scripts: Write test scripts using a supported programming language and Appium client library. Run the test scripts to verify the functionality and behavior of the mobile app.
Setting up Appium can be a complex process, but following these steps can help you get started with test automation for mobile apps.
What is desired capability in Appium?
Desired capabilities in Appium are a set of key-value pairs that define the characteristics of the mobile device, application, or testing environment used for automation testing. These capabilities allow the automation script to specify the device’s properties, such as platform name, device name, app package, app activity, etc., and configure the test execution accordingly.
Some common desired capabilities used in Appium include:
platformName: The name of the device’s operating system, such as Android or iOS.
deviceName: The name of the mobile device on which the application is to be tested.
appPackage: The application’s package name that needs to be tested.
appActivity: The name of the activity to be launched for the application.
automationName: The name of the automation tool to be used for testing, such as Appium or Selendroid.
udid: The unique device identifier of the mobile device.
browserName: The browser name to be tested in case of mobile web automation.
appiumVersion: The version of Appium to be used for testing.
These desired capabilities can be set in the automation script or the Appium server. They help to customize the test execution and ensure that the automation script runs on the desired device and application with the required configurations.
What is an Appium session?
An Appium session, used in Appium to automate mobile applications, is a communication channel between the client and the Appium server. The session is started once the client requests to start a session with the Appium server and receives a session ID in return. The client and server’s subsequent communications will all use the session ID.
The client asks the Appium server to perform various tasks during the session, including opening the application, interacting with UI elements, taking screenshots, and other operations. These requests are handled by the server, which then provides the client with answers. The client can end the session once it is finished by requesting the Appium server to do so.
What is the difference between Appium and TestNG?
Here are the differences between Appium and TestNG:
Appium | TestNG |
Automation tool for mobile applications. | Testing framework for Java-based applications. |
Supports multiple programming languages such as Java, Python, Ruby, C#, and JavaScript. | Supports Java programming language. |
Supports both Android and iOS platforms. | Supports desktop and web applications. |
Executes tests on real devices and emulators/simulators. | Executes tests on JVM. |
Provides basic reports and integrates with third-party reporting tools. | Provides detailed HTML reports. |
Supports parallel execution using WebDriver. | Supports parallel execution using TestNG annotations. |
Supports data-driven testing using external data sources. | Supports data-driven testing using DataProvider annotation. |
Provides limited test management features. | Does not provide any test management features. |
Uses Appium dependencies to manage device-specific drivers. | Uses Maven or Gradle for dependency management. |
Can integrate with CI/CD tools such as Jenkins, CircleCI, and Travis CI. | Can integrate with CI/CD tools such as Jenkins and Bamboo. |
Has a large, active community with frequent updates and bug fixes. | Has a smaller community compared to Appium. |
What is the difference between iOS and Android automation?
Here are the differences between iOS and Android automation:
iOS Automation | Android Automation |
iOS apps are built using Xcode and can only run on iOS devices. | Android apps are built using Android Studio and can run on a wide range of Android devices. |
iOS automation requires the use of Apple’s XCUITest framework. | Android automation can use a variety of frameworks, including Espresso and UiAutomator2. |
iOS automation uses XCTest to write and execute tests. | Android automation uses JUnit or TestNG to write and execute tests. |
iOS automation requires Xcode and macOS to set up the test environment. | Android automation can be set up on macOS, Windows, or Linux. |
iOS automation uses the XCTest framework to interact with the app’s UI elements. | Android automation uses different frameworks like Espresso or UiAutomator2 to interact with the app’s UI elements. |
iOS automation provides support for simulators and real devices for testing. | Android automation also provides support for simulators and real devices for testing. |
iOS automation uses the XCUITest driver to interact with the app. | Android automation uses the UiAutomator2 or Espresso driver to interact with the app. |
iOS automation requires the use of an iOS Developer Program account to test on real devices. | Android automation does not require a developer account to test on real devices. |
iOS automation is generally considered to have better performance and stability than Android automation. | Android automation can sometimes face issues with fragmentation due to a large number of Android devices and operating system versions available. |
How to install and use Appium on Windows?
To install and use Appium on Windows, follow the below steps:
**Download and install the latest version of Node.js from the official website.Open the command prompt and install Appium globally by running the following command:
npm install -g appiumDownload and install the Java Development Kit (JDK) from the official website.Set the JAVA_HOME environment variable to the JDK installation path.Download and install Android Studio from the official website.Set the ANDROID_HOME environment variable to the Android SDK installation path.Add the path of the platform tools and tools folders to the PATH environment variable.Launch the Appium server by running the following command in the command prompt:
appiumUse any programming language of your choice to write Appium scripts and execute them.Connect a physical device or emulator to your system and specify the device details in the Appium script.Run the Appium script to execute the automation test on the connected device.**
These steps are general guidelines for installing and using Appium on Windows. The actual steps may vary depending on your system’s specific version and configuration. It is recommended to refer to the official Appium documentation for detailed and up-to-date instructions.
How to install and use Appium on Mac?
To install and use Appium on a Mac, follow these steps: Install Homebrew: Homebrew is a package manager for Mac.
**Open the terminal and run the following command to install Homebrew:
/bin/bash -c “$(curl -fsSL <https://raw.githubusercontent.com/Homebrew/install/HEAD/install.sh>)”Install Node.js: Appium is built using Node.js, so you need to install Node.js. Run the following command to install Node.js:
brew install nodeInstall Appium: Run the following command to install Appium:
npm install -g appiumInstall Appium Doctor: Appium Doctor is a command-line tool that checks your system for all the dependencies required by Appium. Run the following command to install Appium Doctor:
npm install -g appium-doctorCheck Appium Dependencies: Run the following command to check if all the dependencies required by Appium are installed on your system:
appium-doctorDownload and install Xcode: If you want to test iOS applications, you need to install Xcode from the App Store.Download and install Android Studio: If you want to test Android applications, download and install Android Studio from the official website.Launch Appium: Run the following command to launch Appium:
appiumConfigure Desired Capabilities: To run your tests on real devices or emulators, you must configure the desired capabilities. You can set the desired capabilities in the code or use Appium Desktop.**
Once you have completed these steps, you can start writing your Appium test scripts and run them on real devices or emulators.
What is the difference between Appium and Robot Framework?
Here are some differences between Appium and Robot Framework:
iOS Automation | Android Automation |
iOS apps are built using Xcode and can only run on iOS devices. | Android apps are built using Android Studio and can run on a wide range of Android devices. |
Appium | Robot Framework |
Open-source mobile automation tool | Open-source test automation framework |
Specifically designed for mobile automation testing. | Can be used for various types of software testing. |
Supports various programming languages such as Java, Python, Ruby, JavaScript, etc. | Uses its scripting language called Robot Framework Language (RFL). |
Supports both Android and iOS platforms. | Can be used for web, desktop, and mobile testing. |
Uses client-server architecture to communicate with mobile devices. | Executes test cases on the system under test (SUT) directly. |
Requires a device-specific SDK and USB driver to be installed. | Does not require any specific SDK or driver. |
Can automate native, hybrid, and web applications. | Can automate web, desktop, and mobile applications. |
Provides support for visual testing with image comparison. | Provides support for keyword-driven testing. |
Has a built-in Appium Inspector for element inspection. | Requires additional libraries for user interface (UI) inspection. |
Requires Appium server to be installed and configured. | Requires Robot Framework to be installed and configured. |
What is the use of Appium for cross-platform testing?
Here are some benefits of using Appium for cross-platform testing:
Write once, run anywhere: Testers can write test scripts once and run them on both Android and iOS platforms, thus, saving time and effort.Open-source: Being an open-source tool, it allows developers to create their custom solutions based on the requirements.Supports multiple programming languages: Appium supports multiple programming languages like Java, Python, Ruby, and JavaScript. This makes it easy for developers and testers to choose their preferred language for writing scripts.Supports multiple automation frameworks: Appium supports multiple automation frameworks like Selenium, Espresso, and XCUITest. This makes it easy for developers and testers to choose the automation framework that best suits their needs.
What is the use of Appium for cloud testing?
Appium can be used for cloud testing by integrating with cloud-based platforms like LambdaTest, a cloud-based digital experience testing platform. Cloud testing allows for testing on a variety of devices and operating systems without the need for physical devices or emulators, which can be time-consuming and costly to set up and maintain.
Testers can run automated tests on actual devices in a cloud environment using Appium with LambdaTest, which can aid in identifying problems that might not be obvious when testing on emulators or simulators. A large test suite can be run much faster thanks to cloud testing’s parallel testing feature, which enables multiple tests to run concurrently on various devices.
What are the different types of locators in Appium?
Locators in Appium are used to identify elements in the user interface of a mobile application. Several types of locators are available in Appium, including:
ID: An ID locator is used to locate an element by its unique identifier.Name: A name locator is used to locate an element by its name attribute.Class name: A class name locator is used to locate an element by its class attribute.XPath: An XPath locator is used to locate an element using an XPath expression.CSS selector: A CSS selector locator is used to locate an element using a CSS selector expression.Accessibility ID: An accessibility ID locator is used to locate an element by its accessibility identifier, assigned to elements for use with accessibility tools.
What is the difference between a Simulator and an Emulator?
Here are the differences between a Simulator and an Emulator:
Simulators | Emulators |
Simulators are software programs designed to mimic the behavior of a real device without actually running the operating system on the device. | Emulators are software programs designed to replicate the behavior of a real device, including the hardware and software components, on a different device or platform. |
Simulators are usually used for mobile application development and testing. | Emulators are usually used for application development, testing, and debugging on different platforms. |
Simulators are faster than emulators because they don’t have to run the operating system on the device. | Emulators are slower than simulators because they have to emulate both the hardware and software components of the device. |
Simulators can only simulate a subset of the device’s functionality and behavior and may not accurately represent real-world performance. | Emulators can accurately replicate the behavior and performance of a real device. |
Simulators are specific to a particular platform, such as iOS or Android. | Emulators can be used to simulate different platforms, such as running Android on a Windows PC or running Windows on a Mac. |
How do you launch an App in Appium?
To launch an app in Appium, you must first set the desired capabilities for the app package and activity name. The app package name is the package name of the app you want to launch, and the app activity name is the app’s main activity.
Once the desired capabilities are set, you can create a new session with the Appium server, and the app will be launched on the device or emulator.
Here’s an example of launching an app in Java:
DesiredCapabilities capabilities = new DesiredCapabilities();
capabilities.setCapability(“platformName”, “Android”);
capabilities.setCapability(“deviceName”, “emulator-5554”);
capabilities.setCapability(“appPackage”, “com.example.myapp”);
capabilities.setCapability(“appActivity”, “.MainActivity”);
URL url = new URL(“<http://127.0.0.1:4723/wd/hub>”);
AndroidDriver<MobileElement> driver = new AndroidDriver<>(url, capabilities);
In this example, we’re launching an Android app with package name “com.example.myapp” and main activity “.MainActivity” on an emulator with device name “emulator-5554”.
What is Appium Inspector?
Appium Inspector is a graphical user interface (GUI) tool provided by Appium, used to inspect and interact with the user interface (UI) elements of mobile applications, allowing testers and developers to understand the app’s structure and automate their testing efforts.
What is the role of the Appium server in automation testing?
In automation testing, the Appium server plays a crucial role as it acts as a mediator between the mobile device and the automation script. The Appium server is responsible for receiving the commands from the automation script and translating them into actions on the mobile device.
The Appium server also offers several features and customization options for the automation testing procedure. These abilities include managing the application lifecycle, setting up device-specific configurations, and controlling session timeouts.
What is the difference between a real device and a virtual device in Appium?
Here are the differences between a real or physical device and a virtual device in Appium:
Real Device | Virtual Device |
Actual physical devices such as a smartphone or tablet. | Emulated device or simulator created on the computer. |
Real devices have their hardware, software, and firmware. | Virtual devices use the computer’s hardware and software to simulate the behavior of a real device. |
Testing on real devices provides more accurate results. | Testing on virtual devices is faster and more cost-effective. |
The device can have various states, such as low battery, network issues, or other real-world scenarios. | The virtual device can simulate different scenarios, such as battery life, network conditions, etc. |
Real devices have unique identifiers, making testing specific devices easier. | Virtual devices can be easily created and configured for testing various device configurations and operating systems. |
Testing on real devices requires physical access to the device. | Testing on virtual devices can be done remotely or locally without the need for physical access to the device. |
Real devices provide a better user experience, as it represents the actual device environment. | Virtual devices can have some limitations in terms of their emulation of certain device features or hardware components. |
Real devices must be connected to the computer via USB or Wi-Fi for testing. | Virtual devices do not require any additional hardware or connections for testing. |
What is the Appium client-server architecture?
The Appium client-server architecture is a design pattern used to run Appium tests. It involves two main components: the Appium server and the client script. The Appium server is responsible for interacting with the mobile device or emulator and executing the test script commands on the device.
How do you set up Appium on a remote server?
Setting up Appium on a remote server involves a few additional steps compared to setting it up on a local machine. Here are the general steps:
Choose a cloud provider: You can choose from various cloud providers like AWS, Google Cloud, Microsoft Azure, etc., based on your requirements and budget.
Create a virtual machine: Once you have chosen your cloud provider, create a virtual machine (VM) instance with the required specifications like RAM, CPU, storage, etc.
Install required dependencies: Once your VM is up and running, install the required dependencies like Java, Android SDK, Node.js, and Appium.
Configure Appium: Once Appium is installed, you’ll need to configure it to work with your remote server.
Connect to your device or emulator: Finally, you’ll need to connect your device or emulator to the remote server.
It’s important to note that setting up Appium on a remote server can be more complex than setting it up locally and requires a good understanding of networking and system administration. However, running automated tests on many devices can be cost-effective without maintaining a local device lab.
How do you perform parallel testing in Appium?
Parallel testing in Appium involves running multiple tests simultaneously on multiple devices or simulators/emulators. This can significantly reduce the execution time of a test suite, making it more efficient and productive.
Here are the steps to perform parallel testing in Appium:
Set up the Appium environment: On the device used to run the tests, install and configure Appium. Ensure the devices, emulators, and simulators have the necessary drivers installed.
Prepare the test cases: Write the test cases that need to be run in parallel. These test cases should be independent and not interfere with each other’s execution.
Set up the test configuration: Define the test configuration, including the number of devices/simulators/emulators to be used, the desired capabilities for each device, and the Appium server port numbers for each device.
Run the tests in parallel: Use a test framework like TestNG or JUnit to run the tests in parallel. Configure the test framework to execute the tests on multiple devices/simulators/emulators simultaneously.Analyze the results: Once the tests are complete, analyze the results to identify any issues or defects. You can generate reports to get an overview of the test execution status.
How do you set up Appium on Windows?
To set up Appium on Windows, you can follow these steps:
**Install Node.js: First, you need to install Node.js on your system. You can download the Node.js installer from the official website and install it on your system.Install Appium: Once Node.js is installed, you can install Appium using the Node Package Manager (npm). Open a Command Prompt window and run the command: npm install -g appium This command will download and install Appium and all its dependencies.Install Appium Doctor: Appium Doctor is a command-line tool that checks the configuration of your system and ensures that everything is set up correctly for Appium to run. To install Appium Doctor, run the following command:
npm install -g appium-doctorSet up the Android SDK: If you want to use Appium to automate Android apps, you need to install the Android SDK on your system. You can download the Android SDK from the official website and install it on your system.Set up the Android Emulator: To run your tests on an Android emulator, you need to create an emulator first. You can do this using the Android Virtual Device (AVD) Manager, which is included with the Android SDK.Set up the Java Development Kit (JDK): Appium is built using Java, so you need to install the Java Development Kit (JDK) on your system. You can download the JDK from the official website and install it on your system.Set up the Appium Server: To start the Appium Server, open a Command Prompt window and run the following command:
appium This command will start the Appium Server and display the log output in the Command Prompt window.Configure your test scripts: Finally, you can write your test scripts using your favorite programming language and the Appium client library. You need to set the desired capabilities of your test, including the app package name, app activity name, and the device name or UDID.**
These are the basic steps to set up Appium on Windows. Once you have everything set up, you can start writing and running your Appium tests.
What is the difference between mobile web automation and native app automation in Appium?
Here’s a comparison table between mobile web automation and native app automation in Appium:
Mobile Web Automation | Native App Automation |
Automation of web applications accessed through a mobile browser | Automation of native mobile applications developed for specific mobile platforms (iOS, Android, etc.) |
Web browser on mobile devices (Safari, Chrome, Firefox, etc.) | Native mobile applications installed on mobile devices |
Limited control over user interface elements | Full control over all user interface elements |
Slower than native app automation due to network latency and rendering of web pages | Faster than mobile web automation due to direct access to native platform functionality and no network latency |
Testing of web applications on mobile devices | Testing of native mobile applications on mobile devices |
Selenium, WebDriver, etc. | Appium, Espresso, XCUITest, etc. |
Limited code reusability across platforms | Maximum code reusability across different mobile platforms |
Can be accessed from any mobile device with a web browser | Requires specific mobile devices for testing depending on the mobile platform |
Limited support for native APIs, as most of the functionality is exposed through the web application itself | Full support for native APIs, allowing for direct testing of native functionality such as camera, sensors, and other hardware |
Limited to web application testing scenarios, such as page navigation and form filling | Full coverage of native mobile application testing scenarios, including user input, device interaction, and navigation |
How do you run Appium tests on a real device?
Running Appium tests on real devices is an important aspect of mobile app testing as it provides a more accurate representation of how the app will perform in the real world. Here are the steps to run Appium tests on a real device:
Connect the device to the computer: Connect the device to the computer using a USB cable. Make sure that USB debugging is enabled on the device.
Set up the device in Appium: Open Appium and set up the device configuration. Enter the device name, platform name, platform version, and other required details in the Appium GUI.
Set up the Appium environment: Set up the Appium environment by installing the required software and dependencies. This includes installing the Appium server, the mobile app on the device, and the test framework.
Create the test script: Use your preferred test automation framework (such as TestNG, JUnit, or Cucumber). In the script, specify the capabilities required for the device, such as the device name and platform version.
Start the Appium server: Start the Appium server from the command line or using the Appium GUI.
Run the test script: Run the test script using your preferred test automation framework. The test script will execute on the real device, and the results will be displayed on the test framework dashboard.
Analyze the results: Analyze the test results to identify any issues and debug the test failures.
Running Appium tests on real devices can be more challenging than running them on emulators or simulators. The setup and configuration process can be more complex, and there may be issues related to connectivity, device drivers, or hardware limitations. However, the benefits of running tests on real devices outweigh the challenges, as it provides a more accurate representation of how the app will perform in the real world.
What is Appium’s approach to parallel testing?
Appium provides a variety of methods to enable parallel testing to achieve faster test execution and better test coverage. Here are some ways that Appium supports parallel testing:
Running tests on multiple devices: Appium allows users to run tests on multiple devices simultaneously. This can be achieved by starting multiple Appium servers and pointing each test to a different server. Alternatively, Appium also provides the ability to create a “grid” of devices using tools like Selenium Grid or Appium Grid, allowing users to run tests on multiple devices in parallel.
Running tests on multiple emulators/simulators: Users can simultaneously run tests on various emulators and simulators using Appium. To accomplish this, launch several emulator or simulator instances, and direct each test to a different instance.
Running tests in parallel on a single device: Appium supports running tests on a single device using multi-threading. Users can create multiple threads and run tests in each thread simultaneously.
Running tests in parallel across multiple languages: Appium supports multiple programming languages, allowing users to write tests in different languages and run them in parallel.
Running tests in parallel across multiple frameworks: Appium also supports multiple testing frameworks, such as TestNG and JUnit, allowing users to write tests in different frameworks and run them in parallel.
What is the difference between AndroidDriver and iOSDriver in Appium?
AndroidDriver and iOSDriver are two driver classes in Appium used for automating Android and iOS devices, respectively. Here are some differences between them:
Criteria | AndroidDriver | iOSDriver |
Platform | Android | iOS |
Inherits | AppiumDriver | AppiumDriver |
Capabilities | ‘AndroidCapabilities’ | ‘IOSCapabilities’ |
UIAutomator | Yes | No |
XCUITest | No | Yes |
Selendroid | Yes | No |
Automation Name | uiautomator2 (default) or uiautomator | XCUITest (default) |
Package Name | ‘appPackage’ | ‘bundleId’ |
Activity Name | ‘appActivity’ | ‘app’ |
Context | NATIVE_APP, WEBVIEW_ or WEBVIEW_com.package.name | NATIVE_APP, WEBVIEW_ or WEBVIEW_com.bundle.id |
Integration with OS | Deep integration with Android OS | Deep integration with iOS |
Support | Supports wide range of Android devices | Supports wide range of iOS devices |
Performance | Usually faster | Usually slower |
Language | Java, Kotlin, Python, JavaScript, Ruby, C#, etc. | Java, Python, JavaScript, Ruby, C#, etc. |
What are the best practices for writing maintainable and scalable Appium tests?
When it comes to writing maintainable and scalable Appium tests, there are several best practices to keep in mind. Here are some of the most important ones:
Follow the Page Object Model (POM) design pattern: To do this, divide your code into various page classes, each representing a single-page application. By separating the test code from the application code, POM aims to make it simpler to maintain and update the tests as the application evolves.
Use descriptive names for your elements: It’s important to give meaningful names to the elements you interact with in your tests so that it’s easy to understand what they do and how they’re used. This can be especially important when dealing with complex or dynamic UIs.
Minimize the use of sleep statements: Sleep statements can be useful for waiting for elements to load or for animations to complete, but they can also slow down your tests and make them less reliable. Instead, use explicit waits to wait for specific conditions to be met before continuing with the test. You can also use LambdaTest SmartWait for optimized sleep statements
Use data-driven testing: Consider using external data sources, such as spreadsheets or databases, to provide input data for your tests rather than hard-coding it into your tests. As a result, updating your test data is simpler and doesn’t require changing your tests.
Write reusable test code: Create code for your tests that can be quickly used in other tests or other application areas. Your tests will become more modular and less repetitive as a result.
Use version control: Make sure to keep your tests and test code under version control so that you can easily track changes and revert to previous versions if necessary.
Use a continuous integration (CI) system: Use a CI system like Jenkins or Travis CI to automatically run your tests whenever new code is pushed to your repository. This can help catch bugs early and ensure your tests remain up-to-date as your application changes.
What is the difference between Appium’s automationName capabilities for Android and iOS?
The ‘automationName’ capability is used in Appium to specify the automation technology to be used for a specific platform. Different automation technologies are available for Android and iOS, so the ‘automationName’ capability has different values for each platform.
Here’s a comparison of the different ‘automationName’ capabilities for Android and iOS:
Parameter | Android | iOS |
Default Automation Engine | UiAutomator2 | XCUITest |
Supported Automation Engines | UiAutomator2, Espresso | XCUITest, UIAutomation |
UiAutomator2 / XCUITest | Recommended for Android API levels 21 and above, can access all elements on the screen, interact with system and installed apps, supports most of the commands | Recommended for iOS versions 9.3 and above, can access all elements on the screen, interact with system and installed apps, supports most of the commands |
Espresso / UIAutomation | Faster response times but more complex to set up, may not support all commands or locators | Deprecated, works on older iOS versions (9.3 and below) but doesn’t support iOS 10 and above |
What is the difference between Appium’s web context and native context?
Here is a comparison of Appium’s web context and native context:
Web Context | Native Context |
The web context is used to automate web-based applications or websites in a mobile browser. | The native context automates native mobile applications built using platform-specific frameworks like UIKit for iOS or Android SDK for Android. |
In the web context, Appium controls the browser and executes commands using the WebDriver protocol. | In the native context, Appium interacts directly with the native UI elements of the application using platform-specific automation frameworks like UIAutomator2 for Android or XCUITest for iOS. |
Web context supports standard web automation techniques like locating elements using CSS selectors or XPath. | Native context allows access to the full range of native UI elements and functionalities of the application, including gestures, alerts, pop-ups, and device-specific features. |
In the web context, testing is focused on web-related functionality like page navigation, form input, and interaction with web elements. | In the native context, testing covers the entire spectrum of the application, including navigation, UI interactions, business logic, and integration with device features like camera, GPS, or push notifications. |
Web context testing uses emulators, simulators, or real devices. | Native context testing requires real devices or simulators/emulators specific to the targeted platform. |
Web context testing can be cross-platform, allowing tests to be executed on different mobile platforms using a single codebase. | Native context testing requires separate test codes for each targeted platform due to the platform-specific nature of the application. |
Examples of web context automation include testing mobile versions of websites or web-based mobile applications. | Examples of native context automation include testing native iOS or Android applications. |
How do you automate native applications in Appium?
To automate native applications in Appium, follow these steps:
Install and set up Appium: First, download and install Appium on your system. You will also need to install the relevant mobile SDKs and tools for the platform you want to automate (Android or iOS).
Create a new Appium project: Once you have installed Appium, create a new project and configure the desired capabilities for your device or emulator. You can specify the platformName, deviceName, app, and other capabilities depending on your requirements.
Launch the app: Use the driver’s launchApp() method to launch the app on the device or emulator. You can also use the closeApp() method to close the app.
Locate and interact with elements: Use the various element locating strategies in Appium, such as ID, class name, accessibility ID, XPath, etc., to locate the desired elements in the app’s UI.
Handle alerts and pop-ups: If your app displays alerts or pop-ups, you can use the switchTo().alert() method to switch to the alert context and handle it using the various alert methods available.
Use gestures to interact with the app: You can use various gestures, such as tap, swipe, pinch, and zoom, to interact with the app’s UI.
Take screenshots and videos: Appium’s getScreenshotAs() method takes screenshots of the app’s UI during the test run.
Generate reports: You can use various reporting tools and frameworks, such as Extent Reports, TestNG, JUnit, etc., to generate comprehensive reports of the test results.
Clean up: Once the test run is complete, use the quit() method to close the session and clean up any resources used by Appium.
Following these steps, you can automate native applications in Appium and run efficient and effective test suites for your mobile apps.
How do you automate hybrid applications in Appium?
Hybrid applications are a combination of native and web-based applications, which means that they are built using web technologies (HTML, CSS, and JavaScript) but are packaged like native applications. Automating hybrid applications using Appium requires a slightly different approach than automating native or web-based applications.
Here are the steps to automate hybrid applications using Appium:
Launch the hybrid application: First, the hybrid application needs to be launched on the device or emulator where the automation will be executed.
Switch to the web view: Hybrid applications have both a native view and a web view. To automate the web view, we need to switch to the ‘context’ of the web view.
Interact with the web elements: Once we have switched to the web view context, we can use the standard WebDriver methods to interact with the web elements such as ‘click()’, ‘sendKeys()’, ‘getText()’, and so on.
Switch back to the native view: Once we are done with the web view, we need to switch back to the native view context to interact with the native elements.
Interact with the native elements: Once we have switched to the native view context, we can use the Appium-specific methods to interact with the native elements such as ‘click()’, ‘sendKeys()’, ‘getText()’, and so on.
Close the application: Finally, we need to close the hybrid application after the automation is complete. This can be done using the ‘closeApp()’ or ‘terminateApp()’ method in Appium.
How do you automate web applications in Appium?
To automate web applications using Appium, you need to use the mobile web automation framework, which is built on top of the Selenium WebDriver API. Here are the steps to automate a web application using Appium:
Launch the Appium server and connect to the device or emulator you want to automate.
Create a new instance of the DesiredCapabilities class and set the following capabilities:
platformName: Set this to “Android” or “iOS” depending on the platform you want to automate.platformVersion: The version of the platform.
deviceName: The name of the device or emulator.browserName: The name of the browser you want to automate. For example, “Chrome” or “Safari”.
Create a new instance of the RemoteWebDriver class, passing in the URL of the Appium server and the DesiredCapabilities object.
Navigate to the web application URL you want to automate using the get() method of the RemoteWebDriver object.
Use the ‘findElement()’ method of the RemoteWebDriver object to locate web elements on the page and interact with them using the various methods provided by the WebElement interface.
For example, to enter text into a text field, we can use the sendKeys() method of the WebElement interface:
WebElement element = driver.findElement(By.id(“username”));
element.sendKeys(“myusername”);
To click on a button, we can use the click() method of the WebElement interface:
WebElement element = driver.findElement(By.id(“login-button”));
element.click();
Once you have completed the automation tasks, you can close the web browser and quit the RemoteWebDriver object:
driver.quit();
Following these steps, you can automate web applications using Appium and the Selenium WebDriver API.
How do you perform cross-platform testing using Appium?
Cross-platform testing is an essential aspect of mobile automation testing. It allows testers to simultaneously validate the same application on multiple operating systems and devices. Here are the steps to perform cross-platform testing using Appium:
Create the Desired Capabilities for the application: The desired capabilities are used to specify the platform, device name, application, and other parameters required for automation testing. The desired capabilities for iOS and Android devices differ, and the tester must create them accordingly.
Create a Page Object Model: The Page Object Model is used to map the application’s elements and pages with the code, which makes the test more readable and maintainable.
Create the test script: The test script must be created using the Appium test framework. The script must be written to handle the differences between the iOS and Android platforms.
Run the test script: The test script can be run on both iOS and Android platforms by specifying the platform’s desired capabilities. Appium takes care of the rest, and the same test script can be used for both platforms.
Analyze the results: After running the test, the results can be analyzed using various tools like Jenkins, Selenium Grid, and others. The results must be analyzed separately for each platform to identify the differences between them.
By following these steps, testers can ensure that the application works seamlessly on both platforms.
How do you debug Appium scripts?
Debugging Appium scripts is an essential part of the automation process to ensure that scripts run correctly and identify issues or errors during the script execution. Here are some ways to debug Appium scripts:
Use Appium Inspector: It allows developers to inspect elements of the app on which they want to run their tests. The tool helps identify elements, their properties, and values to debug Appium scripts quickly.
Use the Appium logs: Appium generates logs during the test execution. The logs contain information such as server responses, errors, exceptions, and other details. You can analyze the logs to identify the root cause of the issues.
Use breakpoints: Breakpoints are markers set in the code to stop the code execution at a specific point. Developers can add breakpoints to their scripts and run the code in debug mode. When the code execution reaches a breakpoint, it stops, and developers can analyze the current state of the code and identify any issues or errors.
Use IDE debugging tools: Most IDEs provide debugging tools that help developers debug their scripts. These tools include the ability to set breakpoints, step into, step over, and step out of the code execution. Developers can use these tools to analyze the code, identify the issues, and fix them.
We can Use print statements: Developers can add print statements in their scripts to output the values of variables or object properties. This way, developers can verify that the values are correct at each stage of the script execution.
How do you use Appium to automate testing on the cloud?
Appium provides support for cloud-based mobile testing services like LambdaTest. This enables mobile app testing on a wide range of devices without the need for physical devices. To use Appium for cloud-based testing, the following steps can be followed:
Create an account with a cloud-based testing platform like LambdaTest.Configure the desired capabilities for the device(s) to be used in the testing. This includes specifying the device name, platform version, appium version, automation name, and other relevant details.Obtain the URL for the cloud device and set it as the remote server URL for Appium.Instantiate the driver object with the desired capabilities and the remote server URL.Write the test scripts using the Appium API, such as locating and interacting with elements, performing assertions, and handling exceptions.Run the test scripts on the cloud device(s) using the appropriate command or tool provided by the cloud-based testing service.
Monitor the test execution and results, and analyze any failures or errors.
To start with LambdaTest, follow these simple steps:
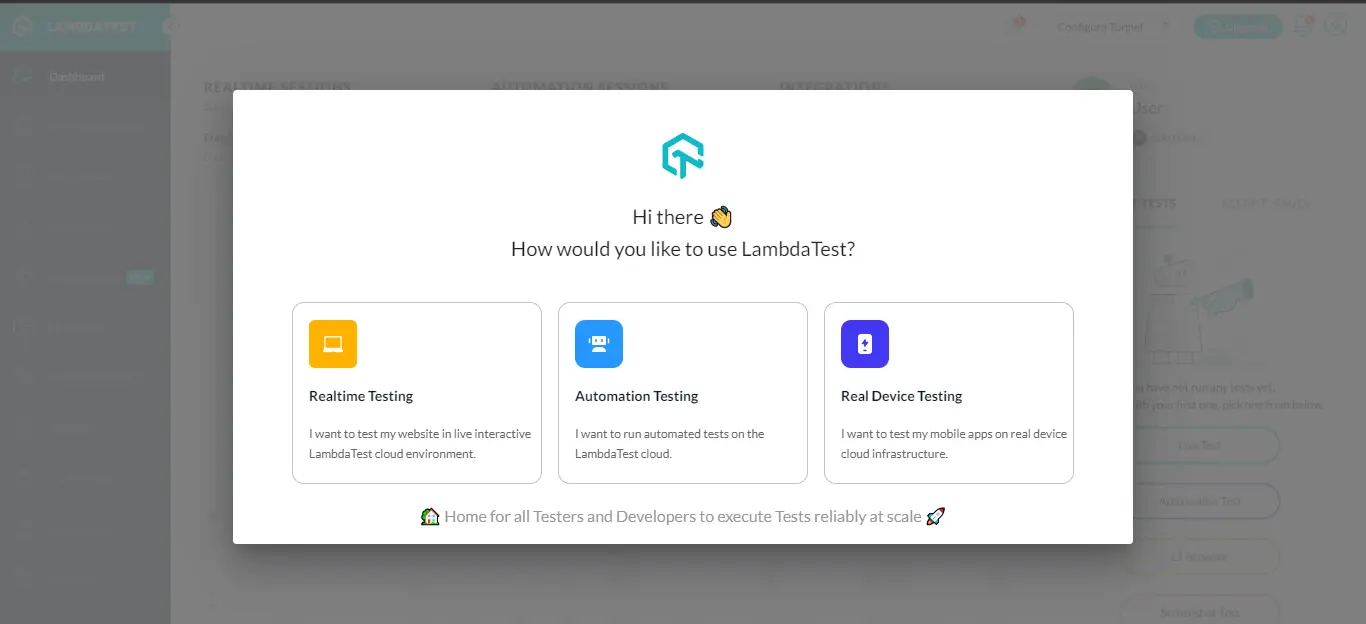
Manual Testing using LambdaTest
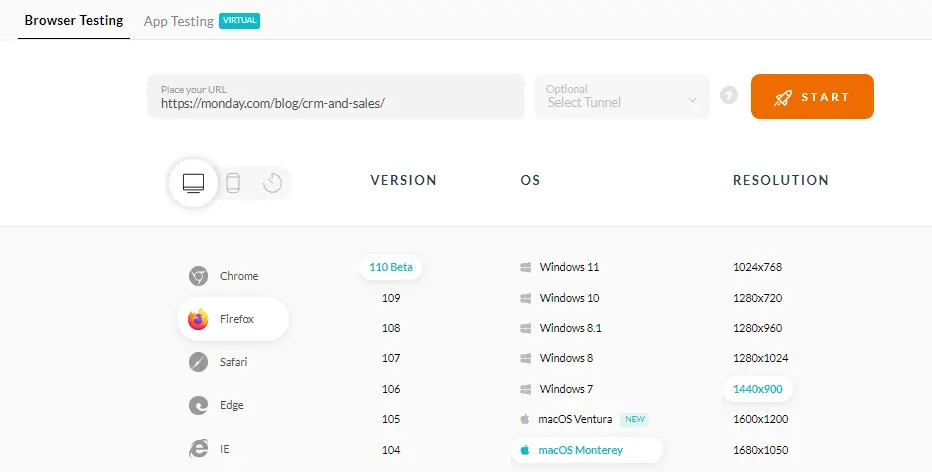
Register for free and sign in to your LambdaTest account.Choose a Realtime Testing card from the modal box.Enter the test URL, choose your preferred browser’s version, OS, and resolution, and select either web or mobile tab. Then click START.
!https://www.lambdatest.com/resources/images/learning-hub/appium-interview-questions-click-start.webp
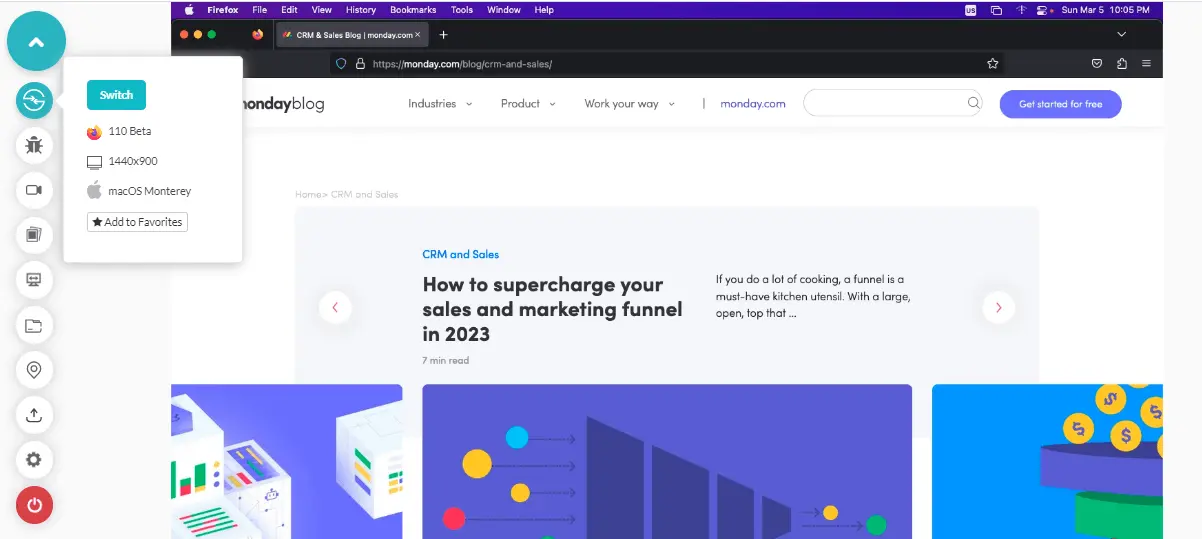
You will get a cloud-based machine launched which runs on the operating system and real browsers. Here, you can run a test by leveraging features like one-click bug logging, video recording of a test session, and others.
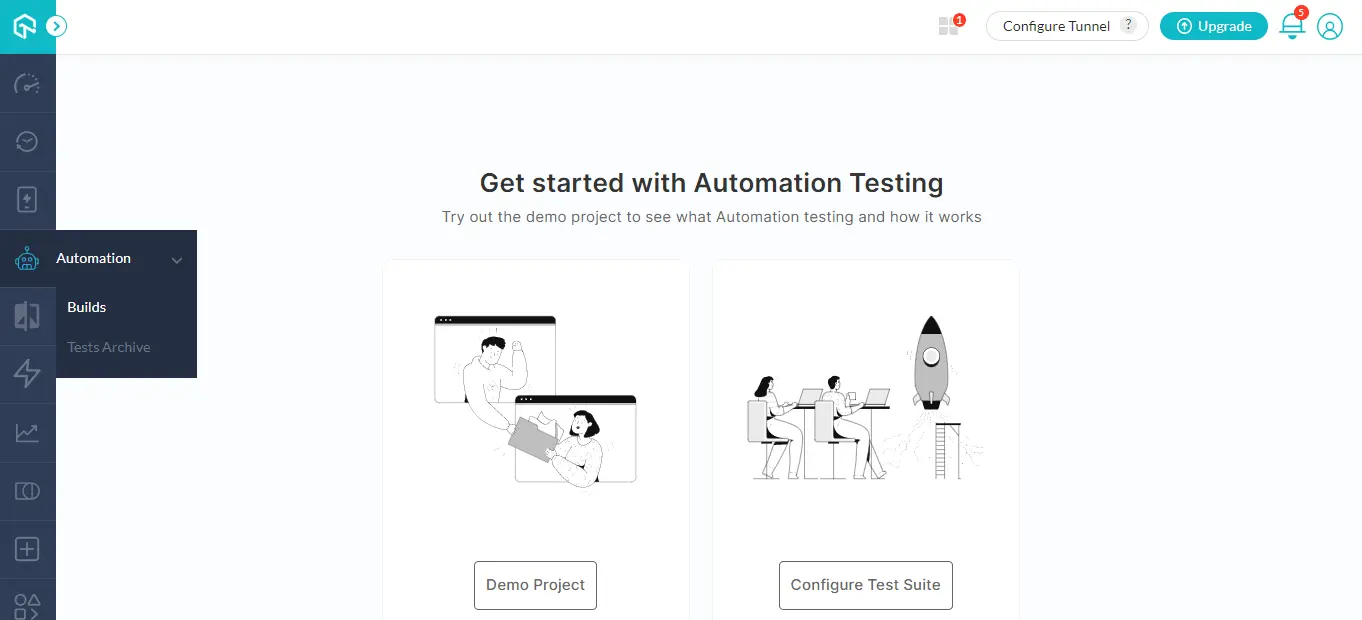
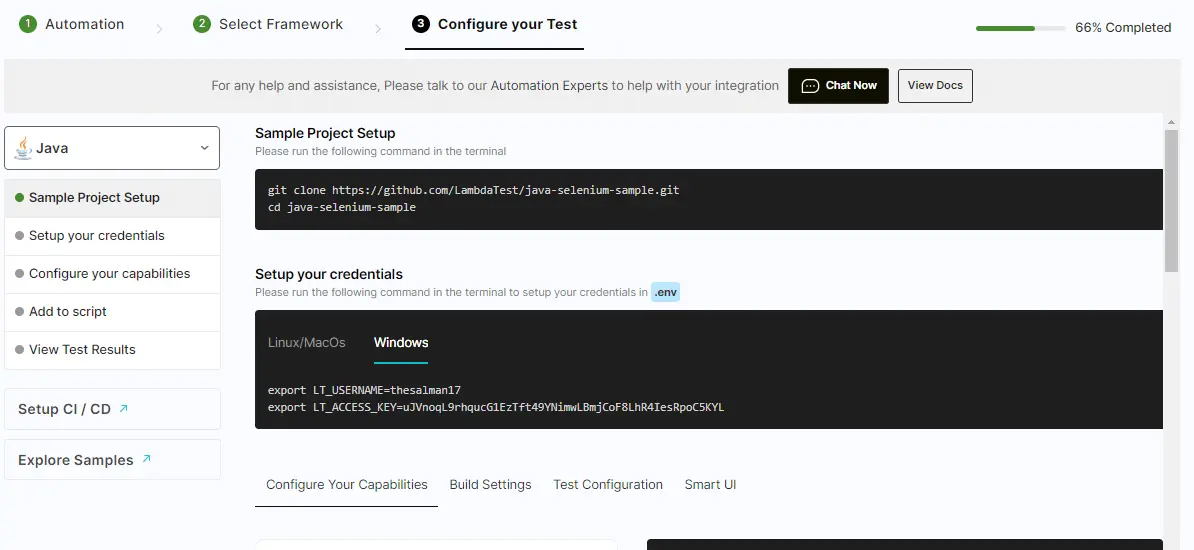
Automation Testing with LambdaTest
Follow these steps to perform an automation test.
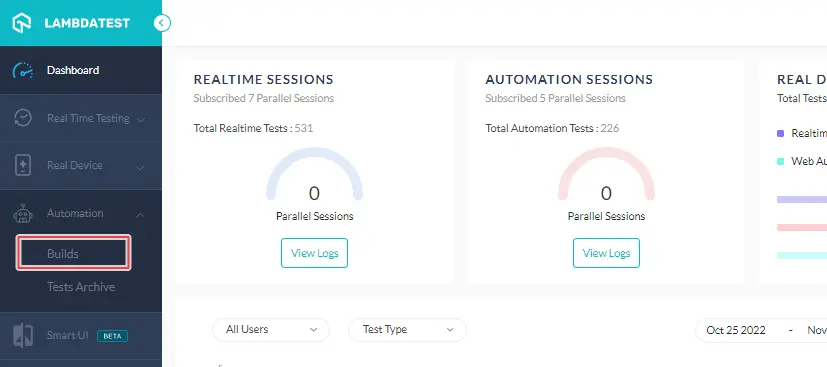
Log in to your LambdaTest account.
Navigate to Automation > Builds from the left sidebar menu.Select any from the Demo Project or Configure Test Suite.
Choose Configure Test Suite option, then choose the preferred automation tool or framework to run the grey box test.
We can now configure the test and start testing your software application.
To get started with automation testing, please check LambdaTest documentation.
Can you explain the concept of the Appium Grid?
Appium Grid is a tool that allows you to distribute your Appium test cases across multiple devices or emulators in parallel. It helps run tests faster and more efficiently, as you can run multiple tests on different devices simultaneously. This is particularly useful when you have many tests or need to support multiple platforms.
Appium Grid consists of two components:
Grid Hub acts as a central point that receives test requests from your test scripts and distributes them to available Grid Nodes.Grid Nodes are the real devices or emulators on which the tests will be run.
Can you explain the concept of Appium server architecture?
Appium is an open-source mobile automation tool for testing native, hybrid, and mobile web applications on Android and iOS devices. The architecture of the Appium server is a key aspect of its functionality and effectiveness in mobile automation testing.
The Appium server architecture can be divided into three main components:
Appium Client: It is a client-side component that interacts with the Appium server using the JSON Wire Protocol. Appium clients are available in various programming languages like Java, Python, Ruby, JavaScript, etc., and they are responsible for writing and executing test scripts.
Appium Server: It is the central element of the Appium server architecture and is in charge of responding to requests from the Appium client and interacting with mobile devices. The Appium server is installed on the machine where the test scripts are run, and it communicates with the mobile device using a particular driver. Various drivers are offered for Android and iOS devices, including the Appium Android Driver and Appium iOS Driver.
Mobile Device: It is the target device on which the mobile application is tested. The Appium server communicates with the mobile device through the driver, which is specific to the platform.
Multiple devices can be tested simultaneously by multiple clients thanks to the Appium server architecture. The architecture uses a RESTful API to communicate with the mobile device and run the desired test cases. For initiating and terminating Appium sessions, executing commands, and obtaining device data, the Appium server offers a variety of endpoints.
What is the difference between Appium and Espresso?
Here’s a comparison between Appium and Espresso:
Feature | Appium | Espresso |
Platform Support | Cross-platform (iOS, Android, Windows) | Android-only |
Language Support | Supports multiple languages (Java, Python, Ruby, etc.) | Supports only Java and Kotlin |
UI Testing Capability | Supports both Native and Hybrid apps, as well as Web apps | Supports only Native apps |
Testing Tools Integration | Can integrate with multiple testing tools (JUnit, TestNG, etc.) | Specifically designed to integrate with Android Studio and Gradle |
Test Automation Framework | Supports multiple test automation frameworks. | Has its own built-in test automation framework |
Element Locator | Supports multiple locator strategies (XPath, ID, Name, etc.) | Primarily uses ViewMatchers, ViewActions, and ViewAssertions |
Performance | Slower compared to Espresso | Faster compared to Appium |
Development Cost | Relatively higher | Relatively lower |
Popularity | More popular compared to Espresso | Less popular compared to Appium |
Can you explain the concept of Appium server logs?
Server logs in Appium refer to specific details about the Appium server’s activity throughout a test run. They are essential for debugging and resolving problems that might occur while testing. The server logs include useful details about the operations that the server carries out, as well as any errors or cautions that might appear.
Appium provides different types of logs, including:
Console logs: These are the logs generated by the Appium server on the console during the test run. They contain information such as server start time, device configuration details, and execution status.
File logs: These are the logs generated by the Appium server during the test run and saved in a file. The file logs contain more detailed information than the console logs and are useful for debugging.
Crash logs: These are the logs the Appium server generates when an application crashes during the test run. Crash logs contain information about the cause of the crash, the stack trace, and other relevant details.
Appium server logs provide valuable information about the execution status of your test cases and help you to identify and resolve any issues that may arise during testing.
What is the difference between Appium and Calabash?
Although Appium and Calabash are free and open-source frameworks for mobile automation, they differ in architecture, supported programming languages, and compatibility. Some significant variations between Calabash and Appium include
Feature | Appium | Calabash |
Platform support | Supports both iOS and Android platforms | Supports both iOS and Android platforms |
Programming language | Supports multiple languages like Java, Python, Ruby, etc. | Primarily uses Ruby for writing test scripts |
Architecture | Follows the client-server architecture model. | Also follows the client-server architecture model. |
Community support | Has a large and active community of developers | Has a relatively smaller community of developers |
Test script execution | Test scripts can be executed locally or remotely on cloud-based devices | Test scripts can be executed only on connected devices |
Learning curve | Has a steep learning curve due to its extensive features and functionalities | Has a relatively easy learning curve |
UI support | Supports both native and hybrid applications | Supports both native and hybrid applications |
Integration support | Integrates well with various testing frameworks like TestNG, JUnit, etc. | Integrates well with Ruby-based testing frameworks |
Debugging support | Offers built-in support for debugging with features like step-by-step debugging, etc. | Offers debugging support with the help of command-line tools |
Licensing | Appium is open source and free to use | Calabash is open source and free to use. |
What is the difference between the Appium server and the Appium client?
Here are the differences between Appium Server and Appium Client:
Appium Server | Appium Client |
Acts as a central hub for Appium and handles the communication between the client and the device under test. | Sends commands to the Appium Server to perform automated testing. |
Supports different types of clients such as Java, Python, Ruby, JavaScript, etc. | Supports different platforms like Android, iOS, Windows, and Firefox OS. |
Handles the low-level interactions with the device under test, such as installing and launching the app, performing gestures, etc. | Sends high-level commands to the Appium Server to interact with the device. |
Runs as a standalone process on the machine where it is installed. | Runs as a library or a package within the test automation framework. |
Supports parallel execution of multiple tests using Appium Grid. | Implements the logic of the test cases and test suites and integrates with the test framework. |
Provides various capabilities for the device under test, such as device name, platform name, platform version, etc. | Handles the test data and test results. |
Enables logging and debugging of automated tests. | Provides an API to interact with the Appium Server and the device under test. |
How do you start the Appium server, and what are the different flags available?
To start the Appium server, you must install Appium on your system. Once you have installed Appium, you can start the server by following these steps:
Open the terminal or command prompt and type “appium” to start the Appium server. Alternatively, you can start the Appium server using the Appium desktop application. After installing the Appium desktop application, open it, and click on the “Start Server” button.
When starting the Appium server, several flags are available that you can use to customize the server’s behavior. Here are some commonly used flags:
- -address’: Sets the IP address of the server.
- -port’: Sets the port number of the server.
- -session-override’: Enables the server to override any existing sessions.
- -no-reset’: Disables the server’s reset behavior, which clears the app data between sessions.
- -log-level’: Sets the server’s log level.
- -log-timestamp’: Enables or disables the timestamp in the server’s logs.
- -relaxed-security’: The server can run with relaxed security settings.
- -default-capabilities’: Sets the default capabilities that the server uses if no capabilities are provided when starting a session.
These flags can be used individually or in combination with each other when starting the Appium server.
How do you run Appium tests in parallel on multiple devices?
Running Appium tests parallelly on several devices can significantly speed up the testing process. Here are the steps to run Appium tests in parallel on multiple devices:
Set up the Appium environment on each device: Install the required dependencies, such as the Appium server and the appropriate driver for each device.
Configure each device: Ensure each device is properly connected to the network and the necessary settings are configured correctly.
Set up the test project: Create a test project that can be run on each device, and configure the test framework to allow for parallel testing.
Configure the Appium driver: Use the Appium driver to connect to each device, and configure the driver to use the correct device settings and desired capabilities.
Launch the tests: Start the tests on each device simultaneously, using a tool or script that can execute the tests in parallel.
Analyze the results: Collect the results from each device and analyze the data to determine any issues or failures.
What are the different types of Appium frameworks available?
Appium is an open-source automation framework that is widely used for mobile app testing. It allows you to write and execute automated tests for mobile applications on multiple platforms, including Android and iOS. While there are various frameworks that can be used in conjunction with Appium, here are a few popular ones:
TestNG framework: TestNG is a testing framework used for unit testing, integration testing, and functional testing. It can be used with Appium to automate mobile testing.
Cucumber framework: Cucumber is an open-source testing tool for behavior-driven development. It enables collaboration between different stakeholders and allows for the writing of high-quality test cases.
JUnit: JUnit is a popular unit testing framework for Java. It provides a simple and straightforward way to write and execute tests. With Appium, you can use JUnit to write and organize your test cases, and leverage its assertions and annotations to define test behavior.
XCTest: XCTest is the default testing framework for iOS applications. It is designed and maintained by Apple and provides a comprehensive set of APIs for testing iOS apps. Appium leverages XCTest internally to automate iOS app testing, allowing you to write and execute tests using the XCTest framework.
Robot Framework: Robot Framework is an open-source, keyword-driven testing framework that supports Appium for mobile app testing. It utilizes a simple tabular syntax and offers a rich set of libraries and tools for test automation. With Robot Framework, you can write test cases in a highly readable format and easily integrate them with Appium for mobile app testing.
These are just a few examples of the frameworks that can be used with Appium. The choice of framework depends on specific requirements, programming language preference, and the level of abstraction and features you desire for your test automation.
What are the best practices to follow while designing Appium tests?
When designing Appium tests, several best practices can help ensure the tests are efficient, effective, and maintainable. Here are some of the best practices to follow:
Use wait commands: It is important to add wait commands in your test scripts to avoid synchronization issues. Wait commands can be added to ensure that the test waits for an element to appear or disappear before performing any actions on it.
Use XPath or CSS selectors instead of IDs: IDs can be dynamic and change when the application is updated. Using XPath or CSS selectors instead of IDs can help ensure your test scripts are more reliable.
Use descriptive test names: Using descriptive test names can make it easier to understand each test case’s purpose and help identify issues more quickly.
Use a version control system: Using a version control system such as Git can help to manage changes to your test scripts and make it easier to collaborate with other team members.
Keep tests small and focused: Keeping tests small and focused can help to identify issues more quickly and make it easier to maintain the tests.
Use test data generation tools: Test data generation tools can help generate test data automatically, saving time and reducing the risk of human error.
Following these best practices can help to ensure that your Appium tests are effective, efficient, and maintainable and can help you to achieve your testing goals.
How do you integrate Appium with other tools, like Jenkins or Selenium Grid?
Here are the steps to integrate Appium with Jenkins:
Install the Appium plugin for Jenkins. This plugin provides integration between Jenkins and Appium by allowing you to configure and launch Appium tests as part of a Jenkins build.
Configure Jenkins to use the Appium plugin. You must provide the plugin with the path to your Appium server and the desired capabilities for your tests.
Create a new Jenkins job for your Appium tests. This job will define the build steps for your Appium tests, such as downloading the code, configuring the Appium server, and running the tests.
Configure the build steps for your Jenkins job. This will depend on the type of tests you are running, but generally, you will need to specify the location of the test files, the desired capabilities for the test, and the location of the Appium server.
Run the Jenkins job. This will launch the Appium tests and provide feedback on the status of the test run.
steps to integrate Appium with Selenium Grid like:
Start the Selenium Grid hub. This is the central server that coordinates the test execution on multiple machines.
Start one or more Selenium Grid nodes. These are the machines that will execute the tests.
Start the Appium server on each node. This will allow the nodes to execute mobile tests in addition to web tests.
Configure your tests to use the Selenium Grid hub as the remote WebDriver. This will allow your tests to be executed on the available nodes.
Run your tests. The Selenium Grid hub will automatically distribute your tests across the available nodes, allowing you to execute your tests in parallel.
What are the common challenges faced using Appium, and how do you overcome them?
Here are some common challenges faced while using Appium and how to overcome them:
Device fragmentation: The first and foremost challenge with Appium is the device fragmentation issue. Thousands of devices have different hardware configurations, operating systems, and screen sizes. Testing on all of them can be a challenge. Solution: To overcome this issue, use a device cloud provider to test your application on multiple devices in parallel. This will save time and effort and ensure your app works well on various devices.
Setting up the environment: Setting up the Appium environment can be challenging, especially for beginners. It requires knowledge of different tools and technologies. Solution: To overcome this issue, follow the Appium documentation, which provides step-by-step instructions for setting up the environment. Additionally, various online tutorials and courses can help you get started with Appium.Identifying elements: Identifying elements on the mobile screen is a challenge because of the complex UI structure of mobile applications. Elements can be nested within each other, and it can be difficult to identify the exact element you need. Solution: To overcome this issue, use Appium Inspector, which allows you to inspect the UI of your application and locate the elements you need. Additionally, use unique identifiers such as resource ID, class name, or accessibility ID to locate elements more accurately.Handling dynamic elements: Mobile applications have dynamic elements that change dynamically. This makes it difficult to write tests that work consistently. Solution: To overcome this issue, use dynamic locators that can identify the elements that change dynamically. XPath and CSS selectors can be useful for this purpose.Test stability: Flaky tests are a common challenge in Appium. Tests that fail intermittently can be frustrating and difficult to diagnose. Solution: To overcome this issue, use reliable locators, wait for elements to appear before interacting with them, and avoid hard-coding wait times. Additionally, run tests on stable devices, and use the Appium log to diagnose failures.
By following the best practices and using the right tools and techniques, you can overcome these challenges and write robust and reliable tests.
What are the different types of screen orientations supported in Appium?
Appium supports four types of screen orientations for mobile devices:
PORTRAIT: The device screen orientation is vertical (height is greater than width).
LANDSCAPE: The device screen orientation is horizontal (width is greater than height).
PORTRAIT-UPSIDE-DOWN: The device screen orientation is vertical, but the screen is upside down (height is greater than width).
LANDSCAPE-RIGHT: The device screen orientation is horizontal, but the screen is rotated 90 degrees to the right (width is greater than height).
What are the different types of mobile device settings that can be automated using Appium?
Appium can automate various mobile device settings such as:
Network Settings: Appium can automate network settings such as airplane mode, data roaming, Wi-Fi, and Bluetooth settings.
Time and Date Settings: Appium can automate time and date settings on mobile devices, which include setting up the time zone, time format, and date format.
Battery Settings: Appium can automate battery settings such as battery saver mode and percentage.
Display Settings: Appium can automate display settings, which include screen brightness, screen timeout, and auto-rotate screen.
Language Settings: Appium can automate language settings on mobile devices, which include changing the system language and input language.
Sound Settings: Appium can automate sound settings such as ringtone volume, media volume, and notification volume.
Accessibility Settings: Appium can automate accessibility settings such as enabling/disabling talkback, font size, and display size.
By automating these settings, testers can ensure that their app works seamlessly on different devices with different settings, thus improving the overall user experience.
Intermediate Level Appium Interview Questions
What is WebDriver API?
WebDriver API is a set of interfaces and classes provided by Selenium WebDriver that allows developers to interact with web applications through a browser. WebDriver API provides a simple and efficient way of automating web application testing by simulating user interactions such as clicking on links, entering text, selecting options from dropdowns, etc. WebDriver API is supported by multiple programming languages such as Java, Python, Ruby, etc., and is widely used for automating web application testing.
How to locate an element in Appium?
Locating an element in Appium involves finding the unique attributes of the element and using them to create a locator strategy. Here are the steps to locate an element in Appium:
Open the Appium inspector: The Appium inspector is a tool that allows you to inspect the UI elements of the application being tested.
Launch the application: Launch the application on the device or emulator you are testing.
Connect the device: Connect it to your computer and ensure Appium recognizes it.
Inspect the element: In the Appium inspector, click on the “refresh” button to see the current state of the application. Click on the element you want to locate to view its properties.
Choose a locator strategy: Based on the element’s properties, choose a locator strategy such as ID, name, class name, XPath, or CSS selector.
Implement the locator strategy: Use the selected locator strategy in your automation script to locate the element and perform actions on it.
How to handle timeouts in Appium?
Timeouts are an essential aspect of Appium automation, and several types of timeouts can occur during test execution, such as implicit wait, explicit wait, and page load timeout. Appium provides options to handle these timeouts effectively.
Here are some ways to handle timeouts in Appium:
Implicit Wait: Implicit wait is a global timeout that applies to all elements on the page. You can set the implicit wait timeout using the ‘driver.manage().timeouts().implicitlyWait()’ method in your test script.
Explicit Wait: Explicit wait is a local timeout that applies to a specific element on the page. You can set the explicit wait timeout using the ‘WebDriverWait’ class in your test script.
Page Load Timeout: Page load timeout is the maximum amount of time that the driver should wait for a page to load completely. You can set the page load timeout using the ‘driver.manage().timeouts().pageLoadTimeout()’ method in your test script.
Script Timeout: Script timeout is the maximum time the driver should wait for a script to execute. We can set the script timeout using the ‘driver.manage().timeouts().setScriptTimeout()’ method in your test script.
Expected Conditions: Appium provides several expected conditions, such as ‘elementToBeClickable’, ‘visibilityOfElementLocated’, ‘presenceOfElementLocated’, etc., that can be used to handle timeouts during test execution.
By effectively setting and handling these timeouts, you can ensure that your Appium tests run smoothly and without any interruptions due to timeouts.
What is the difference between XPath and CSS Selectors?
Here is a comparison of XPath and CSS selectors:
XPath | CSS Selector |
XPath is a powerful language for locating elements in XML/HTML documents. | CSS selectors are simple patterns used to select elements based on their attributes. |
XPath provides a wide range of options to locate elements, such as tag name, attribute, text, position, etc. | CSS selectors have a limited set of locators, primarily based on element attributes. |
XPath can traverse the entire XML/HTML document tree, allowing more flexibility in locating elements. | CSS selectors work in a top-down manner, starting from the root element or a specific context. |
XPath expressions can be more complex and may require a deeper understanding of the document structure. | CSS selectors are relatively simpler and easier to read and write. |
XPath has better support for locating elements based on their text content or relationship with other elements. | CSS selectors are more suitable for locating elements based on their attributes. |
XPath can handle complex and nested structures more effectively. | CSS selectors may have limitations when dealing with complex structures or dynamic content. |
XPath is widely used in various automation tools and has better compatibility with older browsers. | CSS selectors have better support in modern browsers and are widely used in web development. |
Overall, both XPath and CSS selectors are useful for element identification in Appium automation, but the choice between them depends on the specific requirements of the test scenario and the familiarity of the tester with each method.
How to launch the Appium Inspector?
The Appium Inspector is a graphical user interface tool that allows testers to inspect and interact with the elements of a mobile application during automation testing. Here are the steps to launch the Appium Inspector:
Open the Appium desktop application and start the Appium server by clicking on the ‘Start Server’ button.
Create a new Appium session by clicking on the ‘New Session Window’ icon in the top left corner of the Appium desktop application.
In the ‘New Session Window’, specify the device and platform details, app path, and other desired capabilities.
Once the session is created, click the ‘Start Inspector Session’ button to launch the Appium Inspector.
In the Appium inspector, select the device and application context from the dropdown menu and click on the ‘Start Session’ button.
The Appium Inspector window will open, displaying the mobile application’s user interface elements.
You can now interact with the elements by clicking, tapping, or swiping. The Appium Inspector will generate the corresponding code for the selected action, which can be used in the test script.
Note: It is essential to make sure that the Appium server and the mobile device are connected to the same network and have the necessary permissions to communicate with each other.
What is the difference between a single and multiple-touch action?
Here are the differences between single and multiple touch actions in Appium:
Single Touch Action | Multiple Touch Action |
Involves only one finger or pointer to perform an action on the screen. | Involves multiple fingers or pointers to perform an action on the screen. |
Can be used for actions such as tap, press, swipe, etc. | Can be used for actions such as pinch and zoom, rotate, etc. |
Can be performed using the ‘touchAction’ method in Appium. | Can be performed using the ‘multiTouchAction’ method in Appium. |
The touchAction method accepts a single TouchAction object as its parameter. | The multiTouchAction method accepts multiple TouchAction objects as its parameters. |
Allows only one action to be performed at a time on the screen. | Allows multiple actions to be performed simultaneously on the screen. |
Examples of single-touch actions include tapping a button, swiping a screen, or scrolling a page. | Examples of multiple-touch actions include zooming in or out of an image, rotating a map, or playing a game that involves multiple touch points. |
How to handle orientation changes in Appium?
Handling orientation changes is a crucial aspect of mobile app testing as it helps to ensure the app’s functionality and user interface remain consistent across different orientations. In Appium, the device’s orientation can be changed using the ‘rotate()’ method, which accepts two values – ‘LANDSCAPE’ and ‘PORTRAIT’.
To handle orientation changes, the following steps can be followed:
Set the desired orientation in the desired capabilities while creating the driver object.
Use the rotate() method to change the device’s orientation during the test execution.
Verify the functionality and UI of the app in the new orientation.
Rotate the device back to the original orientation after completing the test.
By following the above steps, orientation changes can be handled effectively in Appium.
- In which form you get the build for Android and iOS platforms?
- For Android file with .apk extension and for iOS .app or .ipa.
- What are the minimum and maximum OS versions the app can be tested on?
It is set by product owner and technical team. You can get the information by using adb command. One of which is the dumpsys command.
For this example, general store app is installed, run “adb shell dumpsys package com.androidsample.generalstore ”.
This will return a big list , we can filter it using grep “adb shell dumpsys package com.androidsample.generalstore | grep versionName” returns “versionName=1.0”.
or “adb shell dumpsys package com.androidsample.generalstore | grep versionCode” returns “versionCode=1 minSdk=21 targetSdk=28”, which shows minimum Android version that is supported and the version that is targeted by the build.
- In today’s world having such a wide range of devices as a QA how would you decide which devices need to be picked for testing?
- Generally BI and technical teams decide it by running surveys and using third party software such google firebase which can give the percentage wise usage of devices in a particular region.
- How to get crash logs in Android and iOS?
- In android you can get it via logcats. Android studio is very useful to filter the logs.
Generally crash logs start with FETAL MAIN EXCEPTION.
For Mac console app can be used. More info at
https://eshop.macsales.com/blog/45586-how-to-use-the-mac-console-app-to-diagnose-a-crash/
- How to perform Locale testing (in context of different part of the world).
- How do you perform performance testing in mobile?
- How do you simulate different network conditions?
- How to test Deep links on mobile?
- How do you monitor/test network traffic in mobile apps? Charles Breakpoints in charles and usage.
- How to change values in responses using charles?
- How to install and uninstall app using adb?
- Adb install <path/to/the apk>
- How to record screens using adb?
- Screen record – A very useful tool that I use several times a day is the screen record command: “adb shell screenrecord /sdcard/sampleVideo.mp4”. As you’d expect, this will record the screen for a max of 3 mins. When you want the recording to stop, press ctrl+c on your keyboard and the pull the file onto your pc,
- How to change battery level adb?
- One of my favorite adb commands is the battery manipulation commands:
- “adb shell dumpsys battery” will provide a read-out of all battery related information.
- “adb shell dumpsys battery set level 5” will set the battery level to 5. Very useful for low battery testing on Android. However, since the device is still connected to your PC, we need to make it seem like it is not charging, so use the following in conjunction:
- “adb shell dumpsys battery unplug” makes the device appear as unplugged.
- When you are all done with your testing, use the following to reset all battery configs: “adb shell dumpsys battery reset”.
- There are other commands such as “adb shell xdumpsys battery set status 3”, for instance, which fakes battery discharge etc.
- How to push files to device/emulator using adb?
- Push files to device – Often times you need to push files or folders to the device.
- a. Use the following for this: “adb push /file/on/computer /sdcard/”, this will put a file in your root folder.
- b. Or say you have a media payload on your computer you want in your Downloads folder on your device: “adb push/Users/xyz123/Desktop/Payloads/sdcard/Downloads”.
- c. This is especially useful when pushing a debug property file to your device or a Charles certificate: “adb push /Users/xyz123/Desktop/PropFiles-Highlights/syncdrive-bt-debug.properties /sdcard/”.
- How to filter debug logcat logs?
- Using sample command. This command shows how we can filter logs from a particular apps. “adb logcat | findstr com.example.package”
- What is signed apk?
- Application signing ensures that one application cannot access any other application except through well-defined IPC. When an application (APK file) is installed onto an Android device, the Package Manager verifies that the APK has been properly signed with the certificate included in that APK.
- Tell me a few known device farms.
Browserstack, SeeTest, Pcloudy, Saculabs etc.
- How do you identify that it is a hybrid application?
Yes, there is a simple way to distinguish between hybrid and native app. Go to Developer Options from Settings and turn on Show Layout bounds. And then launch your app and see the layout highlighted. If there are lots of rectangles highlighted, it’s native. Otherwise hybrid.
- Can you break the .apk file and analyze the source code?
Analyze APK and view Android Manifest – This is a useful task that is sometimes required during testing. This method provides the most information about an app including various assets, images, animations, colors, fonts, strings, Spanish strings, api information, screen sizes supported, supported architectures, supported devices/manufacturers, contact account information, layout information such as font sizes, padding, and much more. Follow the following steps to analyze an APK:
- Launch Android Studio on your computer and Select ‘Start a new Android Studio
project. Select ‘Next’ a few times and then select ‘Finish’ (these details are not
important for what we need to do).
- In the top pane, select the ‘Build’ drop down menu and then select ‘Analyze
APK.’ Using the file browser on screen, navigate to the APK file you want to
explore. Select it and hit ‘OK.’ This will take some time to load.
- From here you can click around on the various drop-down menus and view all of
the available content. “AndroidManifest.xml” will be displayed towards the top.
Note – use a debug APK for this.
- How do you perform tests in a cloud environment?
https://www.browserstack.com/docs/app-automate/appium/getting-started/java
- Testing your app with faceID.
https://appiumpro.com/editions/80-testing-ios-face-id-with-appium
- Working with different permissions and other Adb commands.
Grant/Revoke permissions – Sometimes it can be useful when testing to revoke or grant a permission at a specific point in the app flow, without launching settings, or maybe there is a hidden permission that cannot be revoked within settings. To do this, you will need to get a read-out of all the Android permissions,
- As an example, lets revoke the storage permission of the XYZ app, after having granted it in the UI. For this, we need to revoke read and write permissions, so I will join to adb commands together as such: “adb shell pm revoke com.xyz.android.xyz android.permission.READ_EXTERNAL_STORAGE && adb shell pm revoke com.sfr.android.sfrcloud android.permission.WRITE_EXTERNAL_STORAGE”. Now if you check App settings, storage will be revoked. As a tip, you can combine any ADB commands using the “&&” concatenation command. Just make sure you call “adb” again in xthe 2nd command, or else it will throw an error.
- The same can be done for granting permissions: “adb shell pm grant com.xyz.android.xyz android.permission.READ_EXTERNAL_STORAGE && adb shell pm grant com.xyz.android.xyz android.permission.WRITE_EXTERNAL_STORAGE”. And you can swap out the package with any app you would like and also the permission you choose.
Reboot/Download – To restart an Android device via ADB, simply run “adb reboot”. To restart an Android device in download mode, which is used when you would like to load a new firmware on the device, run “adb reboot download”.
Get Network Info – To quickly and easily get network info of your device, run the following: “adb shell netstat”. This can be especially useful when trying to get the IP address that is used for #14 above.
Get device features – Sometimes it is useful to have a readout of all device features.
This can be useful when determining what app features should function with this device or if an app should even be installable on a device, e.g. tablet vs. foldable device vs. TV vs. standard handset. To do this, run: “adb shell pm list features”.
Clear app storage – To quickly and easily clear app storage of an installed app, run the following: “adb shell pm clear com.att.personalcloud”. To get the package name, use #4 or #13 from above.
Make calls and send text – For testing purposes, sometimes we need to test call/text processes while also carrying out a task in the app. To do this, simply run the following commands:
- Call – “adb shell am start -a android.intent.action.CALL -d tel:+19085552244”
- Text – “adb shell am start -a android.intent.action.SENDTO -d
sms:+19085552244 –es sms_body “Test” –ez exit_on_sent false”
- What is a web debugging proxy?
Also known as HTTP monitor or Reverse Proxy, that allows the tester to view all of the HTTP and SSL/HTTPS traffic between their machine and the Internet. … This includes requests, responses, and HTTP headers. Example: Charles.
- What are some of the important mobile application testing?
Usability Testing: Usability testing is one of the sorts of web application testing that is perfect for assessing how the application makes it easier for users to achieve their goals. During this test, participants are given particular, realistic circumstances to use the application in. On the basis of gathering direct input from the end-user, usability testing is also reliable.
As a result, the testing procedure is free of prejudice while simultaneously guaranteeing that highlighted areas improve. Usability testing also ensures that the design is intuitive and prioritises usability and customer experience.
Performance Testing: Performance testing is a critical subset of mobile application testing that examines an application’s performance, stability, and responsiveness under various workload situations. A performance test’s main goal is to ensure that an application is completely aligned with the performance objectives.
Additionally, it addresses performance constraints prior to launching an application. Bottlenecks are processes inside a system’s overall functions that cause the system’s overall performance to slow or stall. Load testing, volume testing, soak testing, spike testing, and stress testing are all popular forms of performance assessments.
Security Testing: In today’s world, security is a major worry for practically every mobile application developer. According to reports, 80% of users are more likely to delete an application because of security concerns. As a result, it is critical to concentrate on mobile application security testing.
Users’ personal information is required by certain programs, such as travel applications, for various transactions. If your application requires something similar, it’s critical that you provide assurances about the application’s confidentiality, integrity, and authenticity. You should have strong tests run on your application that assure that no one can break into someone else’s account by unfair means.
Interruption Testing: Interruption testing is important for determining how an application behaves when it is interrupted before returning to its former state. Incoming phone calls or SMS, alarms, push notifications from mobile applications, battery low or full, network connection loss and recovery, and plugged in or out while charging are all examples of interruptions. In the event of an interruption, an application should normally run in the background and return to its prior state.
Manual Testing: Manual testing is a tried and true method for thoroughly traversing the complexity of mobile application testing. Manual testing ensures that the finished product performs optimally in accordance with the planned expectations. It’s especially useful in situations where the use case isn’t immediately evident. Professional QA testers could work in short bursts to assess an application and ensure that it produces accurate results.
Compatibility Testing: Compatibility testing is one of the most important types of mobile application testing. It’s a form of non-functional testing that ensures a mobile application’s functionality across a variety of operating systems, applications, devices, internal hardware specs, and network conditions. Compatibility testing determines whether a mobile application is compatible with various operating systems and versions.
It also tests a mobile application’s compatibility with various devices, browsers, networks, and other characteristics. Backward compatibility testing and forward compatibility testing are the two types of compatibility testing.
Localisation Testing: Localization testing is a must for mobile applications that are targeted at a certain geographic location. It’s crucial to test the mobile application’s responsiveness to the region’s distinct language and cultural aspects. Local currency, use of suitable time zone date and time formats, numerous local legislation needs, and the text and user interface are only a few of the important areas that localization testing evaluates.
Functional Testing: Functional mobile application testing ensures that the application’s functionalities meet the specified requirements. This form of testing focuses mostly on the mobile application’s main goal and flow. Functionality testing determines if an application can properly launch and install. It also tests the simplicity of sign-up and login, as well as the presentation of push notifications and the proper operation of text boxes and buttons.
Installation Testing: Installation testing, also known as implementation testing, is a good way to ensure that a mobile application is installed and removed correctly. Furthermore, installation testing is necessary to ensure that updates are seamless and error-free. Installation testing also examines what happens if users fail to update a mobile application.
Automated Testing: Certain mobile application quality assessments are overly complicated and time-consuming. In such instances, Mobile application Test Automation Services come into play, providing optimally prepared and effectively conducted automated testing as well as manual testing, which can aid in assuring quality while also allowing for the speedier release of superior goods. As a result, automated testing is a solid source of time and cost savings when it comes to mobile application testing. There are various tools to perform automated testing. Appium is one of them.
Mention the Different Types of Mobile Applications.
Mobile applications can be broadly categorized into three categories i.e, Native app, Web app and Hybrid App.
Native App: Native app is developed specifically for one platform, which is coded with a specific programming language (like Objective C for iOS, Java for Android) and installed directly onto the device and can take full advantage of all the device features. Native apps can use the device’s notification system and can work offline. Native apps are installed through an application store (such as Google Play or Apple’s App Store). Native mobile apps provide fast performance and a high degree of reliability. Example of native apps: Temple Run, Candy Crush, etc.
Web App: Web applications are mobile web portals that are designed, customized and hosted specifically for mobiles. They are accessed through the mobile device’s web browser using a URL. Web apps became really popular when HTML5 came around and people realized that they can obtain native-like functionality in the browser. Mobile web applications cannot use device functionality. Example of web app: google.com, m.snapdeal.com, m.yahoo.com, etc.
Hybrid App: Hybrid Apps are web apps embedded in a native app, run on the device, and are written with web technologies (HTML5, CSS, and JavaScript). Hybrid apps run inside a native container and leverage the device’s browser engine (but not the browser) to render the HTML and process the JavaScript locally. A web-to-native abstraction layer enables access to devices capabilities that are not accessible in mobile web applications, such as the accelerometer, camera, and local storage. A hybrid app is NOT tied to any platform or any particular mobile device. So, it can run on any device once built. Example of a Hybrid app: Flipkart, Facebook, Twitter, etc.
- What are the main advantages Of Using Appium On Sauce Labs?
Saves the time it takes to set up the appium server locally.
You don’t have to install/configure the mobile emulators/simulators in your local environment.
You don’t have to make any modifications to the source on your application.
We can start scaling applications instantly.
- Consider A Scenario Where You Don’t Want To Setup A Whole Infrastructure, And Neither Spend Money. Can Appium Help Out In Such A Scenario?
If you think about it, what really is required is the test script. The fact that you must deploy an Appium server somewhere is just an extra feature. If you want to skip this part, you can rely on some web services that have already deployed a whole architecture of Appium servers for your tests. Most of them are online labs and they support Selenium and Appium. In this way, you don’t spend exorbitant amounts of money and you also don’t invest time and effort on new infrastructure.
- What Are The Problems Faced While Running A Test In A Multithreaded Environment?
You need special care while using Appium in a multithreaded environment. The problem does not rely on the fact of using threads in your tests. You can use them but, you must ensure that no more than one test runs at the same time against the same Appium server. Appium does not support multiple sessions, and unless you have implemented an additional layer on top of it to handle this case, multiple tests might fail.
- List OneThing Which You Cannot Do With Emulators But You Can Do With A Real Device.
- You can test the interrupts like
- Phone calls & Messages
- Battery drains out while using the application under test
- Low battery scenarios
- Memory card mount/unmount scenarios
- Actual performance of your application
- Bluetooth related testing.
- What do you understand by Appium package master? How would you create a package?
Appium package master is a set of tools used to manage and create Appium packages. We can use the following code to create a package:
# using es7/babe1:
Gulp create-package -n <package-name>
#regular es5:
Gulp create-package —nobabe1 -n <package-name>
The package will be generated in the out/<package-name>
- Any Tips Or Tricks To Speed Up My Test Writing Activity while I develop test scripts?
Here is one piece of advice. Since your tests will mostly consist in automation tasks, make interactions reusable!
Do not write the same sub-scenarios twice in your tests, make a diagram of what your scenarios are and split them in sub activities; you will get a graph where some nodes are reachable from more than one node.
So make those tasks parametric and call them in your tests! This will make your test writing experience better even when you need to migrate from existing tests.
- Can you write generic code to generate webdriver instance using Appium APIs for both Android and IOS?
import java.io.File;
import java.lang.reflect.Field;
import java.net.MalformedURLException;
import java.net.URL;
import java.util.ArrayList;
import java.util.Arrays;
import java.util.Calendar;
import java.util.HashMap;
import java.util.List;
import java.util.Map;
import java.util.concurrent.TimeUnit;
import org.apache.commons.lang3.StringUtils;
import org.openqa.selenium.remote.DesiredCapabilities;
import org.slf4j.Logger;
import org.slf4j.LoggerFactory;
import org.testng.Reporter;
import io.appium.java_client.AppiumDriver;
import io.appium.java_client.MobileElement;
import io.appium.java_client.android.AndroidDriver;
import io.appium.java_client.android.AndroidElement;
import io.appium.java_client.ios.IOSDriver;
import io.appium.java_client.ios.IOSElement;
import io.appium.java_client.remote.MobileCapabilityType;
public class AppiumDriverFactory {
private static Logger logger;
private static EnvironmentPropertiesReader configProperty = EnvironmentPropertiesReader.getInstance();
public static AppiumDriver<MobileElement> getDriverInstance() {
return get();
}
private static AppiumDriver<MobileElement> get() {
AppiumDriver<MobileElement> driver = null;
try {
driver = getAppiumDriver();
driver.manage().timeouts().implicitlyWait(10, TimeUnit.SECONDS);
}
catch (Exception e) {
Log.fail(“Could not create a driver session”);
}
return driver;
}
private static AppiumDriver<MobileElement> getAppiumDriver() throws MalformedURLException {
AppiumDriver<MobileElement> driver = null;
DesiredCapabilities capabilities = getDesiredCapabilities();
Log.testCaseInfo(“Initialize the Appium driver…”);
try {
String appiumURL = “http://” + configProperty.getProperty(“hostName”) + “:” + configProperty.getProperty(“portName”) + “/wd/hub”;
capabilities = getDesiredCapabilities();
switch (configProperty.getProperty(“platformName”).toLowerCase())
{
case “android”:
Log.testCaseInfo(“Initializing Android Driver Instance using Appium Driver”);
driver = new AndroidDriver<>(new URL(appiumURL), capabilities);
break;
case “ios”:
Log.testCaseInfo(“Initializing IOS Driver Instance using Appium Driver”);
driver = new IOSDriver<>(new URL(appiumURL), capabilities);
break;
}
}
catch (Exception e) {
Log.fail(“Unable to create driver session with given URL and DesiredCapabilities : ” + e.getMessage());
}
return driver;
}
private static DesiredCapabilities getDesiredCapabilities() throws MalformedURLException {
DesiredCapabilities capabilities = new DesiredCapabilities();
if(configProperty.getProperty(“platformName”).equals(“iOS”))
{
Log.testCaseInfo(“Setting Desired Capabilities for iOS Driver”);
if(configProperty.getProperty(“platformName”)!=null)
capabilities.setCapability(“platformName”, configProperty.getProperty(“platformName”));
Log.testCaseInfo(“Platform Name set as : ” + configProperty.getProperty(“platformName”));
if(configProperty.getProperty(“platformVersioniOS”)!=null)
capabilities.setCapability(“platformVersion”, configProperty.getProperty(“platformVersioniOS”));
Log.testCaseInfo(“Platform Version set as : ” + configProperty.getProperty(“platformVersioniOS”));
if(configProperty.getProperty(“udidiOS”)!=null)
capabilities.setCapability(“deviceName”, configProperty.getProperty(“udidiOS”));
Log.testCaseInfo(“DeviceName Name set as : ” + configProperty.getProperty(“udidiOS”));
capabilities.setCapability(“udid”, configProperty.getProperty(“udidiOS”));
Log.testCaseInfo(“UDID set as : ” + configProperty.getProperty(“udidiOS”));
if (configProperty.getProperty(“appPathiOS”) != null) {
capabilities.setCapability(MobileCapabilityType.APP, configProperty.getProperty(“appPathiOS”));
Log.testCaseInfo(“APP path iOS set as : ” + configProperty.getProperty(“appPathiOS”));
}
}
if(configProperty.getProperty(“platformName”).equals(“Android”))
{
Log.testCaseInfo(“Setting Desired Capabilities for Android Driver”);
if(configProperty.getProperty(“deviceName”)!=null)
capabilities.setCapability(“deviceName”, configProperty.getProperty(“deviceName”));
Log.testCaseInfo(“DeviceName Name set as : ” + configProperty.getProperty(“deviceName”));
if(configProperty.getProperty(“platformName”)!=null)
capabilities.setCapability(“platformName”, configProperty.getProperty(“platformName”));
Log.testCaseInfo(“Platform Name set as : ” + configProperty.getProperty(“platformName”));
if(configProperty.getProperty(“platformVersion”)!=null)
capabilities.setCapability(“platformVersion”, configProperty.getProperty(“platformVersion”));
Log.testCaseInfo(“Platform Version set as : ” + configProperty.getProperty(“platformVersion”));
if(configProperty.getProperty(“installedAndroidApp”).equals(“false”))
{
Log.testCaseInfo(“Setting android app apk path in Desired Capability.. “);
if(configProperty.getProperty(“deviceName”)!=null) {
Log.testCaseInfo(“Device Name set as : ” + configProperty.getProperty(“deviceName”));
capabilities.setCapability(MobileCapabilityType.DEVICE_NAME, configProperty.getProperty(“deviceName”));
}
if(configProperty.getProperty(“appName”)!=null) {
File f = new File(“src”);
File app = new File(f,configProperty.getProperty(“appName”));
capabilities.setCapability(MobileCapabilityType.APP, app.getAbsolutePath());
Log.testCaseInfo(“App Path set as : ” + app.getAbsolutePath() );
}
}
else
{
if(configProperty.getProperty(“appPackage”)!=null) {
Log.testCaseInfo(“App Package set as : ” + configProperty.getProperty(“appPackage”));
capabilities.setCapability(MobileCapabilityType.APP_PACKAGE, configProperty.getProperty(“appPackage”));
}
if(configProperty.getProperty(“appActivity”)!=null) {
Log.testCaseInfo(“App Activity set as : ” + configProperty.getProperty(“appActivity”));
capabilities.setCapability(MobileCapabilityType.APP_ACTIVITY, configProperty.getProperty(“appActivity”));
}
}
Log.testCaseInfo(“Command Time Out set as : ” + configProperty.getProperty(“commandTimeOut”));
capabilities.setCapability(MobileCapabilityType.NEW_COMMAND_TIMEOUT, configProperty.getProperty(“commandTimeOut”));
}
return capabilities;
}
- How to use Android soft keys options Ex. Home, recent apps, back button.
We can do that by using native key package. Below packages are available.
import io.appium.java_client.android.nativekey.AndroidKey;
import io.appium.java_client.android.nativekey.KeyEvent;
Custom methods can be created as.
public void pressHomeKey()
{
((AndroidDriver) driver).pressKey(new KeyEvent(AndroidKey.HOME));
}
public void pressBackKey()
{
((AndroidDriver) driver).pressKey(new KeyEvent(AndroidKey.BACK));
}
public void pressRecentAppKey()
{
((AndroidDriver) driver).pressKey(new KeyEvent(AndroidKey.MENU));
}
public void hideKeyBoard()
{
driver.hideKeyboard();
}
- How to get status bar notification in Android.
Sample code:
public class Android_Notifications {
private String APP = “https://github.com/cloudgrey-io/the-app/releases/download/v1.10.0/TheApp-v1.10.0.apk“;
private AndroidDriver driver;
@Before
public void setUp() throws Exception {
DesiredCapabilities capabilities = new DesiredCapabilities();
capabilities.setCapability(“platformName”, “Android”);
capabilities.setCapability(“deviceName”, “Android Emulator”);
capabilities.setCapability(“automationName”, “UiAutomator2”);
capabilities.setCapability(“app”, APP);
driver = new AndroidDriver(new URL(“http://localhost:4723/wd/hub“), capabilities);
}
@After
public void tearDown() {
if (driver != null) {
driver.quit();
}
}
@Test
@SuppressWarnings(“unchecked”)
public void testNotifications() {
Map<String, Object> res = (Map<String, Object>)driver.executeScript(“mobile: getNotifications”);
List<Map<String, Object>> notifications = (List<Map<String, Object>>)res.get(“statusBarNotifications”);
for (Map<String, Object> notification : notifications) {
Map<String, String> innerNotification = (Map<String, String>)notification.get(“notification”);
if (innerNotification.get(“bigTitle”) != null) {
System.out.println(innerNotification.get(“bigTitle”));
} else {
System.out.println(innerNotification.get(“title”));
}
if (innerNotification.get(“bigText”) != null) {
System.out.println(innerNotification.get(“bigText”));
} else {
System.out.println(innerNotification.get(“text”));
}
}
}
}
- How to make java 15 compatible with appium.
If you are using maven project then update the following in pom.xml
<build>
<plugins>
<plugin>
<groupId>org.apache.maven.plugins</groupId>
<artifactId>maven-compiler-plugin</artifactId>
<configuration>
<source>1.8</source>
<target>1.8</target>
</configuration>
</plugin>
</plugins>
</build>
- How to execute adb command via java code.
import java.net.MalformedURLException;
import java.net.URL;
import java.util.Arrays;
import java.util.List;
import java.util.Map;
import org.openqa.selenium.remote.DesiredCapabilities;
import org.testng.Assert;
import org.testng.annotations.Test;
import com.google.common.collect.ImmutableMap;
import io.appium.java_client.android.AndroidDriver;
import io.appium.java_client.remote.MobileCapabilityType;
public class ADBCommandViaScript {
private static String ANDROID_PHOTO_PATH = “/mnt/sdcard/Pictures”;
@Test
public void testArbitraryADBCommands() throws MalformedURLException {
DesiredCapabilities capabilities = new DesiredCapabilities();
capabilities.setCapability(“platformName”, “Android”);
capabilities.setCapability(“deviceName”, “Android Emulator”);
capabilities.setCapability(“automationName”, “UiAutomator2”);
capabilities.setCapability(MobileCapabilityType.VERSION, “10.0”);
capabilities.setCapability(“noReset”, “true”);
capabilities.setCapability(“fullReset”, “false”);
capabilities.setCapability(“appPackage”, “com.google.android.apps.photos”);
capabilities.setCapability(“appActivity”, “.home.HomeActivity”);
// Open the app.
AndroidDriver driver = new AndroidDriver<>(new URL(“http://localhost:4723/wd/hub“), capabilities);
try {
List<String> removePicsArgs = Arrays.asList(“-rf”, ANDROID_PHOTO_PATH + “/.“);
Map<String, Object> removePicsCmd = ImmutableMap.of(“command”, “rm”, “args”, removePicsArgs);
driver.executeScript(“mobile: shell”, removePicsCmd);
List<String> lsArgs = Arrays.asList(“/mnt/sdcard”);
Map<String, Object> lsCmd = ImmutableMap.of(“command”, “ls”, “args”, lsArgs);
String lsOutput = (String) driver.executeScript(“mobile: shell”, lsCmd);
System.out.println(lsOutput);
Assert.assertEquals(“”, lsOutput);
} finally {
driver.quit();
}
}
}
- How to get memory info during execution?
mport java.net.URL;
import java.util.HashMap;
import java.util.List;
import org.hamcrest.Matchers;
import org.junit.Assert;
import org.junit.Test;
import org.openqa.selenium.remote.DesiredCapabilities;
import io.appium.java_client.android.AndroidDriver;
public class AndroidMemoryInfo {
private static int MEMORY_USAGE_WAIT = 30000;
private static int MEMORY_CAPTURE_WAIT = 10;
private static String PKG = “io.appium.android.apis”;
private static String PERF_TYPE = “memoryinfo”;
private static String PSS_TYPE = “totalPss”;
@Test
public void testMemoryUsage() throws Exception {
DesiredCapabilities capabilities = new DesiredCapabilities();
capabilities.setCapability(“platformName”, “Android”);
capabilities.setCapability(“deviceName”, “Android Emulator”);
capabilities.setCapability(“automationName”, “UiAutomator2”);
//capabilities.setCapability(AndroidMobileCapabilityType.APP_PACKAGE, “io.appium.android.apis”);
AndroidDriver driver = new AndroidDriver(new URL(“http://localhost:4723/wd/hub“), capabilities);
try {
// get the usage at one point in time
int totalPss1 = getMemoryInfo(driver).get(PSS_TYPE);
// then get it again after waiting a while
try { Thread.sleep(MEMORY_USAGE_WAIT); } catch (InterruptedException ign) {}
int totalPss2 = getMemoryInfo(driver).get(PSS_TYPE);
// finally, verify that we haven’t increased usage more than 5%
Assert.assertThat((double) totalPss2, Matchers.lessThan(totalPss1 * 1.05));
} finally {
driver.quit();
}
}
private HashMap<String, Integer> getMemoryInfo(AndroidDriver driver) throws Exception {
List<List<Object>> data = driver.getPerformanceData(PKG, PERF_TYPE, MEMORY_CAPTURE_WAIT);
HashMap<String, Integer> readableData = new HashMap<>();
for (int i = 0; i < data.get(0).size(); i++) {
int val;
if (data.get(1).get(i) == null) {
val = 0;
} else {
val = Integer.parseInt((String) data.get(1).get(i));
}
readableData.put((String) data.get(0).get(i), val);
}
return readableData;
}
}
- How Can I Exchange Data Between My Test And The App I Am Testing?
Appium, actually the WebDriver specification, is not made for exchanging data with your app, it is made to automate it. For this reason, you will probably be surprised in finding data exchange not so easy. Actually it is not impossible to exchange data with your app , however it will require you to build more layers of testability.
- What Data Exchange Is?
When I say “data exchange” I am not referring to scenarios like getting or setting the value of a textbox. I am also not referring to getting or setting the value of an element’s attribute. All these things are easy to achieve in Appium as Selenium provides commands just for those. By “data exchange” I mean exchanging information hosted by complex objects stored in different parts of your webview-based app like the window object.
Consider when you dispatch and capture events, your app can possibly do many things and the ways data flows can be handled are many. Some objects might also have a state and the state machine behind some scenarios in your app can be large and articulated. For all these reasons you might experience problems when testing.
- I Want To Run My Tests In A Multithreaded Environment, Any Problems With That?
Yes! You need some special care when using Appium in a multithreaded environment. The problem does not really rely on the fact of using threads in your tests: you can use them but you must ensure that no more than one test runs at the same time against the same Appium server. As I mentioned, Appium does not support multiple sessions, and unless you implemented an additional layer on top of it to handle this case, some tests might fail.
- Mention What Are The Basic Requirements For Writing Appium Tests?
For writing Appium tests you require:
Driver Client: Appium drives mobile applications as though it were a user. Using a client library you write your Appium tests which wrap your test steps and send them to the Appium server over HTTP.
Appium Session: You have to first initialize a session, as such Appium test takes place in the session. Once the Automation is done for one session, it can be ended and wait for another session
Desired Capabilities: To initialize an Appium session you need to define certain parameters known as “desired capabilities” like PlatformName, PlatformVersion, Device Name and so on. It specifies the kind of automation one requires from the Appium server.
Driver Commands: You can write your test steps using a large and expressive vocabulary of commands.
- List some issues Faced With Cross-Platform Testing.
Generally, the issue depends upon the different OS/device version. It might be that the same application is working on one OS while it might not work on another version. For example, we faced an issue that our application was working fine on iOS 6.x version devices but on tapping a few modules on iOS 5.x devices application crashes and the same happened with 2.3.5 Vs.
- List out the most common problem that a tester faces while performing mobile testing in Cloud Computing.
- Subscription model
- High Costing
- Lock-in
- Internet connectivity issues
- Immense consumption of time in image-based automation testing.
- Automation is restricted by the framework
- Difference between Selenium and Appium.
Selenium is an open-source tool that allows automation for Web applications run in Browsers. Appium is used for automating mobile applications and web applications which run on mobile devices.
- List some common Exceptions in Appium.
- SessionNotFoundException – Thrown when Appium Connection is disconnected or session not established.
- ElementNotFoundException – Thrown when you attempt to find an Element and then the element is not Found.
- WebDriverException – Thrown when the Driver is not existent.
- What would you prefer to test on real devices or use simulators/emulators.
It’s one of the most commonly asked Appium interview questions. You’ve to be little logical and practical while answering it. Don’t just simply answer “It would depend on what you need.”. Because it would be a layman answer which interview won’t expect from you. Rather you should explain it by example.
You can say something like that it’s always best to test on real devices. As it would allow you to catch errors that you may not detect otherwise. But you have to configure the device smartly with the Appium server so that it can detect the device. Sometimes the ADB, the Android debugger may disconnect from the device even if it remains plugged in. And it can cause your tests to fail. To handle such issues, you can write a module which resets the ADB after some time to re-connect the devices.
- What are the probable errors you might see while working with Appium.
Following are the errors you might observe with Appium.
- Error#1: Missing desired capabilities e.g. Device Name, PlatformName.
- Error#2: Couldn’t locate ADB. You may have missed setting the <ANDROID_HOME> environment variable.
- Error#3: Selenium exception <openqa.selenium.SessionNotCreatedException>. It indicates a failure in creating a new session.
- Error#4: Failure in locating a DOM element or determining the XPath.
- Difference between Emulator and Simulator.
Simulator: A simulator is used to simulate an environment with all of the software variables and configurations that will be present in the actual production environment of an application. Simulators do not try to replicate the actual hardware that will run the application in production. Simulators can be written in high-level programming languages because they merely construct software environments. For example, a car racing game application can be thought of as a simulator as it simulates a real car race.
Emulator: An emulator does try to replicate all of the hardware and software aspects of a real-world environment. In most cases, you’ll need to develop an emulator in assembly language to accomplish this. Emulators might thus be thought of as occupying a midway ground between simulators and real-world gadgets. For example, a car simulator racing game can be thought of as an emulator. It provides the hardware aspects of car racing as well with the help of emulators.
Emulators replicate both hardware and software features, whereas simulators solely simulate environment features that may be adjusted or created using the software. Emulators aren’t a replacement for real-device testing since they don’t always do a good job of simulating the hardware and software of a production system. They simply allow you to create an environment that is more similar to that of a real device.
Emulators are somewhat slower as compared to simulators as emulators need to sense the movement of hardware devices, convert it into a digital signal, and then process them.
- When should you use a simulator and when should you use an emulator?
Case when we should use a Simulator: Simulators are typically used in software testing situations where the goal is to ensure that the application functions as intended when interacting with external applications or environments.
For example, you could wish to see if an application can communicate data to another application. Because the actual hardware configuration is unlikely to have much of an impact on data transfers for your program, a simulated environment will usually suffice. Simulated testing environments are also useful for ensuring that an application’s interface shows properly across a range of screen resolutions.
Case when we should use an Emulator: When you need to test how software interacts with underlying hardware or a combination of hardware and software, emulators come in handy.
For example, if we want to discover if a firmware update will cause issues with our software or not, we can find out with the help of an emulator. Alternatively, we could want to know how our program performs when run on multiple CPUs or with varying memory allocations. Emulators come in handy in these situations as well.
- Explain the general responsibilities of a mobile application testing framework. Also explain the general structure of a mobile application testing framework.
Following are the general responsibilities of a mobile application testing framework:
- Choosing a format for expressing expectations
- Developing a means to connect to or control the test application
- Performing the tests and reporting the results
The general structure of a mobile application testing framework consists of the following segments :
- Application Package: This refers to the target application which needs to be run and tested.
- Instrumentation TestRunner: A test case runner that executes test cases against the target application. It includes an SDK tool for creating tests as well as an API tool, such as MonkeyRunner, that gives APIs for designing a program that controls an Android device.
- Test Package: Two classes, Test case classes, and Mock objects are included in the Test Package. The mock object contains mock data that will be used as sample input for test cases, while the test case classes contain test methods to run on the target application.
- Differentiate between Appium and Robotium.
Robotium: Robotium is a testing framework for Android that automates test cases for native and hybrid apps. The developer can use Robotium to construct robust automatic Graphical User Interface (GUI) testing cases for Android applications. A developer might also design a functional, system, and acceptability test scenario, which would cover a wide range of Android activities.
Following are the differences between Appium and Robotium:-
- Appium is a cross-platform testing tool that works on both iOS and Android devices. Robotium, on the other hand, is limited to Android.
- Robotium only supports the Java programming language, but Appium supports a variety of languages.
- The Appium tool does not require any application source code or libraries, whereas the Robotium tool does.
- Appium can test native, web, and hybrid mobile apps, whereas Robotium can only test native and hybrid mobile apps.
- Many frameworks, such as Selenium, are supported by Appium. Robotium, on the other hand, is incompatible with Selenium and many other frameworks.
- You don’t have to reinstall Appium every time you make a little modification. However, a simple change in Robotium code necessitates a complete rebuild.
- Differentiate between open source tools, vendor tools and in house tools.
- Open Source Tools: Open source tools are frameworks and apps that are free to use. Engineers construct this tool and give it free on the internet for other engineers, developers, or enthusiasts to develop and use, which is incredibly beneficial for aspiring developers.
- Vendor Tools: Vendor tools are created by companies that have a license to utilize their tools and codes. Technical support is accessible via the internet for these tools.
- In House Tools: In-house tools are the tools that a corporation develops for its own usage and self-development. They are never made available to the general population.
- Do you think that automation testing can be a complete replacement for manual software testing?
No, automation testing cannot be a complete replacement for manual software testing. This is because the tools used are meant to execute tests once they are set up and proper automation requires as little human participation as feasible. As convenient as it is, it should not be used to replace manual testing; rather, it should be used for repetitive activities such as load testing, which requires thousands of virtual users. Engineers should not automate test scripts if they are only intended to run on a periodic basis, nor should they automate code reviews or bug testing for new software builds that may require human engagement to detect errors. To sum up, we can say that large-scale, repetitive jobs are better suited to automation.
- How much time does Appium take to automate a test?
It depends on the scenario you are testing. If you are verifying multiple flows in a single method, it is likely to take more time. But it is always better to make the test cases precise and straightforward so that if any issue occurs in between your execution, you can have the recovery mechanism.
- Mention the Parallel Testing approach in IOS using Appium?
Selenium is an open-source tool that allows automation for Web applications run in Browsers. Appium is used for automating mobile applications and web applications which run on mobile devices.
- Difference between Selenium and Appium.
Appium has given an option to run iOS tests in parallel from Xcode version 9 and above. There are a couple of prerequisites we need to follow.
- “UDID” should be unique.
- “wdaLocalPort” should be unique
- derivedDataPath root should be unique for each driver instance.
- Sauce Labs gives an option to run iOS tests parallel. We have to upload our Appium test to sauce labs. After that, it will run in multiple iOS tests in parallel.
- What are the selenium commands works with Appium?
Appium implements Selenium WebDriver. That’s why almost all the WebDriver commands work with Appium. Few examples are mentioned below:
- Click() command for clicking/tapping the button/links.
- sendKeys() command to send the value.
- It supports java scripts commands.
- Handles alerts.
- It can switch between the context in web-views.
- Difference between tap and Click.
This is how tap is defined in TouchAction class
/**
- Tap the center of an element.
- @param el element to tap.
- @return this TouchAction, for chaining.
- /
public TouchAction tap(WebElement el) {
ActionParameter action = new ActionParameter(“tap”, (HasIdentity) el);
parameterBuilder.add(action);
return this;
}
while click() can be called directly on WebElement.
you can use click without any issues, Tap () returns TouchAction and is useful in chaining further Action.
- What are the different tools for debugging in Android and iPhone?
We verify the logs to debug the issues occur in the devices. For Android we can check Monitor, “adb logcat” or “dumpsys” . For the iPhone, we can use iPhone configuration utility.
- How can you find bundle id in iOS?
- ●Copy the .ipa file to your systems and change the extension to .zip file●Now unzip the folder and search for iTunesMetadata.plist file●Once you get the file, open it in an editor and search for softwareVersionBundleId. It will give you the bundle id.
- How can you enable the wifi while the phone is in Airplane mode?
ConnectionStateBuilder connection =
new ConnectionStateBuilder();
driver.setConnection
(connection.withWiFiEnabled()
.build());));
- How can you enable unicode keyboard?
We need add below desired capabilities:
desiredCapabilities.setCapability(“unicodeKeyboard”, true);
- How can you copy-paste in Appium?
Well, no direct method is there to do it. However you can get the value using getText() or getAttributes() methods and pass the same value to the sendKeys().
- How to uninstall the app?
//Uninstall the app
public void uninstallApp(String androidSDKToolpath, String deviceId, String pkg)
{
try{
Runtime.getRuntime().exec(androidSDKToolpath+”/adb -s”+ deviceId + “uninstall”+pkg);
}
catch (Exception e)
{
System.out.println(e);
}
}
- How to clear the app data in Android?
//Clear the app data from android
public void clearAppData(String androidSDKToolpath, String deviceId, String app_package) throws IOException {
//adb -s <deviceID> <package name>
Runtime.getRuntime().exec(androidSDKToolpath+”/adb -s “+ deviceId +” shell pm clear “+app_package);
}
- How will you handle failure cases in Appium?
It depends upon the scenarios. If any test cases get failed, we need to restore the app state in order to execute the next test cases. You can do it either in @AfterMethod or using listeners.
- How to make your pass percentage higher in Appium?
Automating app using Appium sometimes makes the scrips inconsistent. If you run the test cases for longer times or may be due to network issues you can face the inconsistency issue. To make the script more robust we can take the following approach.
- Make the script simple. Don’t put all the assertions in one Method . Instead create multiple test methods. It will help to recover the app for failure scenarios.
- Don’t create a big suite. Instead create a small suite and run multiple times. It saves the execution times and in case of failures you can run the rest failure scenarios.
- Run only failure scenarios 2nd time. Make sure this script can run independently.